

Dr. Michael T. DePascale discusses his experience in the development and use of a new clear aligner system
Introduction
In 1998, the field of orthodontics changed completely when the clear aligner system was approved as an alternative to fixed appliances. When first introduced, clear aligners were less efficient than braces and challenged practicing orthodontists with a steep learning curve. Today significant advances in clear aligner technology (largely through improved 3D software and materials) across multiple vendors provide the orthodontist with many options using the power of digital dentistry in the treatment of various malocclusions. Additionally, given the flexibility of clear aligners and patient desires for esthetic treatment options, arguing against the growing use of clear aligners would be futile.
I had the opportunity to work with Ormco™ on Spark™ Clear Aligners, a new clear aligner system that was developed and piloted with orthodontists from around the world. Using TruGEN™ material, Spark was designed to exhibit improved sustained force retention for more efficient tooth movement. I practice daily applying efficient mechanics with passive self-ligation, so two important questions should be answered: Can I deliver the same results with aligners, and can I do it in fewer appointments?
What are the key factors in efficient treatment?
Efficient can be defined as “capable of producing desired results with little or no waste (of time or materials).” In the orthodontic space, efficiency can be defined as “achieving a beautiful smile and occlusion with the simplest mechanics possible, using the fewest number of appointments, in the least amount of time.” Accomplishing this begins with proper diagnosis and case setup, and must also be supported by a product that can perform to the orthodontist’s needs. The Spark™ advanced Approver™ software streamlines the planning process with precise anatomical reproduction of teeth and simulated library roots, as well as extensive customization of tooth movement and auxiliary controls. If digital tooth movement is designed properly by the orthodontist, amazing results can be achieved.
Diagnosis
Figure 1: Initial photos
A 31-year-old female presented with a chief complaint of crowding, bite issues, and dissatisfaction with the appearance of her smile. Additionally, she had previously seen a periodontist regarding the recession on her lower 1’s. The periodontist recommended that she see an orthodontist to idealize the occlusion and to reduce the risk of further recession. Clinical and radiographic exams revealed that she presented with a Class III skeletal and dental malocclusion with moderate maxillary crowding, mild mandibular crowding, and a full anterior crossbite.
Treatment objectives
The treatment objectives were to eliminate the maxillary and mandibular crowding, to fully correct the anterior crossbite, to improve lip support while maintaining torque of the incisors, to eliminate the Class III malocclusion, to align maxillary and mandibular midlines, and to improve the smile arc and esthetics. The smile was designed to be improved by extruding the maxillary incisors while maintaining the vertical position of the posterior teeth and transverse dimensions.
Treatment design
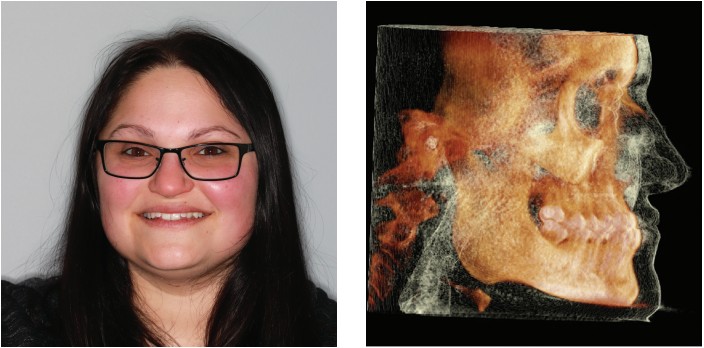
Figure 2: Initial frontal smile and Figure 3: Initial ceph
This case was set up using the digital Approver software for Spark Clear Aligners. The initial setup included horizontal rectangular attachments to control posterior teeth and cutouts for elastics to aid in bite correction. Specifically, there were button cutouts on the facial of the lower 3’s in preparation for Class III elastics as needed, as well as button cutouts on the palatal of the UL3 and LL34 in preparation for crossbite triangle elastics. The lower aligners were designed to have lingual bite turbos on

Figure 4: Initial pan
the L1’s to guide the maxillary anterior teeth forward to correct the crossbite. Once the crossbite was corrected, the refinement setup was designed to focus on improving the smile arc and anterior occlusion while finishing the Class III correction on the right and improving the midlines with elastics. Gingival-beveled attachments were applied wherever extrusion of teeth was necessary. Finally, Caplin Hooks were placed on the facial of upper and lower 56’s in the settling stages to use box elastics to detail the posterior occlusion.
Treatment progression
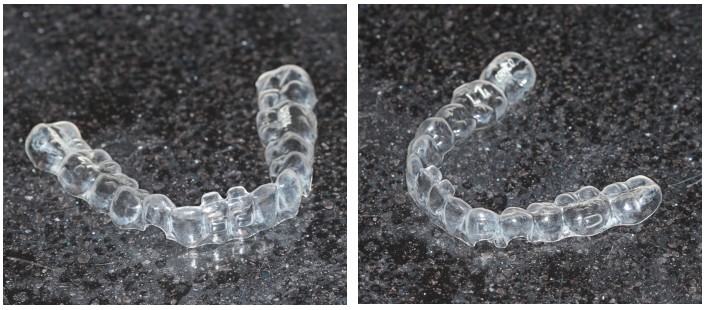
Figure 5: Initial lower aligners with lingual turbos
Appointment 1: Attachments were placed on teeth, and the patient was instructed to wear aligners for 22 hours a day with a Class III elastics (5/16″, 3.5 oz) from the LR3 to UR6 full time.
Appointment 2: First aligner progress appointment. Seating of aligner was evaluated to make sure all teeth were properly tracking. Tracking was ideal. IPR was completed on L4-4. Patient was instructed to continue the Class III elastics on the right side only and begin adding crossbite elastics (3/16″, 3.5 oz). A Caplin Hook was added to palatal of UL3 at this visit.
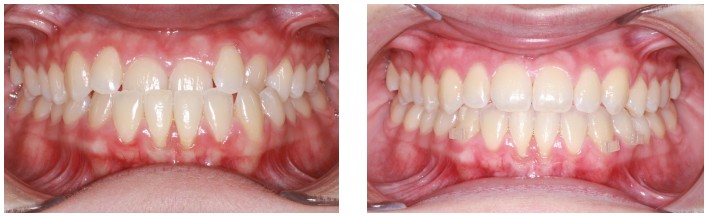
Figure 6: Initial center and Figure 7: 5-month progress center
Appointment 3: Second aligner progress appointment and refinement scan. Patient completed aligner 20/20 in her initial set. Tracking remained ideal. Crossbite elastics on left was stopped. Patient was instructed to continue Class III elastics on the right full-time. A digital intraoral scan was completed for a refinement.
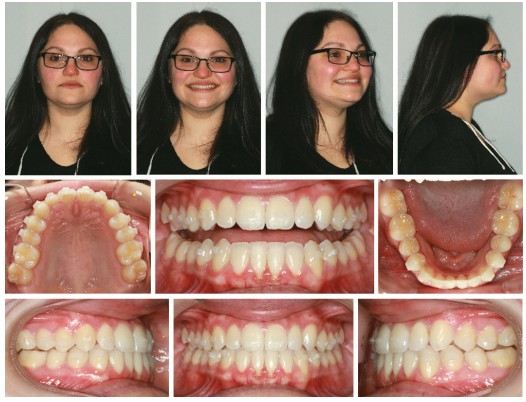
Figure 8: Appointment No. 5
Appointment 4: Refinement No. 1 delivery. Anterior and posterior attachments were placed to help with vertical control of posterior segments while extruding U2-2 for smile arc. Class III elastics on right discontinued.
Appointment 5: Refinement No. 1 progress. Tracking was ideal. Posterior occlusion had opened slightly, so Class III elastics were restarted bilaterally full time to help remove premature anterior contact (see Figure 8).
Appointment 6: Refinement No. 1 progress appointment No. 2. Patient was finished with aligner 14/14 in refinement
No. 1. Tracking was ideal. Alignment was ideal. Posterior occlusion slightly open. All attachments were removed, button cutouts were made in upper and lower 56’s, and Caplin Hooks were placed on upper and lower 56’s. Box elastics U56/L56 (1/4″, 4.5 oz) bilaterally were applied full time.

Figure 9: Final occlusion
Appointment 7: Posterior occlusion fully seated, and treatment objectives were achieved. Total treatment time was 9 months with 34 aligners. Patient was instructed that if her bite became uncomfortable again, additional aligners could be used to add torque U2-2. Due to her Bolton discrepancy and full anterior crossbite initially, this possibility was explained.
*Please note that the final i-CAT images could not be obtained due to the time in which this article was written. At the time, all dental offices were mandated to be closed for anything but emergent care due to COVID-19, and her appointment for final imaging was within this time frame. However, I would be happy to provide the final images to anyone inquiring once they are obtained.
Summary and conclusion
Following a carefully designed treatment plan with very little auxiliary mechanics, a patient presenting with a Class III malocclusion achieved a Class I functional occlusion and esthetic smile in less than 12 months and only 7 appointments using Spark Clear Aligners. Furthermore, the treatment incorporated lingual bite turbos, a novel method with clear aligners.
Orthodontists have used bite turbos to aid in Class III correction for years with braces but have not done the same with aligners. This case clearly demonstrates that these mechanics can also be applied successfully with aligners, and potentially in less time.

Figure 10: Before-and-after smiles
As orthodontists attempt to reduce treatment times, treat in less appointments, attend to patient desires, and improve patient experiences, this serves an example of how that goal can be attained. Gone are the days of claiming that plastic cannot move teeth the way fixed appliances do. Clear aligners can, they do, and they will only continue to be developed into systems that deliver more predictable, more reliable, and more precise results than ever before. Transverse, anterior-posterior, and vertical control were maintained, torque was controlled throughout this entire treatment, and the patient had to be seen only 7 times. When planning is proper, patient education is thorough, and a versatile, customizable product is available, there are no limits to what can be accomplished. I do still practice with a great deal of Damon™ brackets, and I do not intend to change that. As orthodontists, we should be able to treat effectively with both fixed and removable appliances. I firmly believe we are only at the beginning of what can be achieved with aligners. I hope that this case undoubtedly illustrates the changes we can make in the lives of our patients, doing it in a way that provides both the patient and orthodontist excellent results and a fantastic experience.