

Authors’ note: This article is an update to “Getting the Right Shots! Tips and Tricks for Consistent Photographic Excellence,” published in Dentistry Today in March 2013. Both the original article and this update are intended to serve as guides for capturing basic intraoral images. Selecting and managing the photographic equipment and accessories are essential to creating the right images; however, patient and operator positioning may be most important in achieving consistently excellent dental photographs. In this update, we focus on 4 helpful tips to make getting dental intraoral photographs easier and more predictable.
INTRODUCTION
The use of digital imaging for impression making, radiographs, and intraoral and extraoral photographs is essential in current dental practices. The tools used to capture these digital images continue to evolve at a rapid pace, and long gone are the days of 35-mm single-lens reflex cameras to process clinical photographs. Nowadays, digital image capture devices, including intraoral cameras, point-and-shoot cameras, digital single-lens reflex (DSLR) cameras, mirrorless interchangeable-lens cameras, and smartphones are the norm. They come with a multitude of different options for the operator within each type of digital capture device, and the choice of how to get the right digital shots can be confusing. We review 4 tips to help you get the most out of your dental photography.
1. USE DENTAL PHOTOGRAPHY FOR THE RIGHT REASONS
Dental professionals utilize patient images for many reasons, and the need for clinical photography can vary by practitioner, office, and situation. Yoo1 suggested 10 reasons why dental photography should be a part of every practice: diagnosis and treatment planning, patient education, insurance verification, legal documentation, specialist consultation, laboratory communication, marketing, self-education, professional instruction, and treatment philosophy. While not every dental practice will use photography for all these reasons all the time, clinicians must have the tools and skills to capture appropriate images when the need arises.2
2. USE THE RIGHT EQUIPMENT
In general, the types of images a practice wants to collect will determine the equipment needed. If the camera is needed for “quick snaps” to capture patient images only for patient education, documentation, or insurance verification, an intraoral camera or a point-and-shoot camera may be ideal. If the images are for marketing, professional education, publishing, communication with the laboratory, or when more creative flexibility is needed, a camera that produces higher quality images will be needed (eg, a DSLR with a macro lens and macro flash).
Additional equipment needed to incorporate dental photography into the practice includes cheek retractors; a solid-color, non-distracting background; buccal mirrors; and occlusal mirrors. Users may prefer to assemble the dental photographic setup piecemeal (ie, camera, flash, lens, equipment) or visit dental-specific websites to purchase readymade kits. Two such website resources are dinecorp.com and photomed.net.
When selecting a DSLR setup to capture high-quality images, the camera, the lens, and the flash are the 3 main components to consider. In the case of intraoral, point-and-shoot, or smartphone cameras, all 3 components are contained within the same device (Figures 1 and 2).
Figure 1. Sample camera setups: Canon digital single-lens reflex (DSLR) camera with ring flash on the left and Nikon DSLR with dual-point flash on the right. (Image courtesy of photomed.net.)
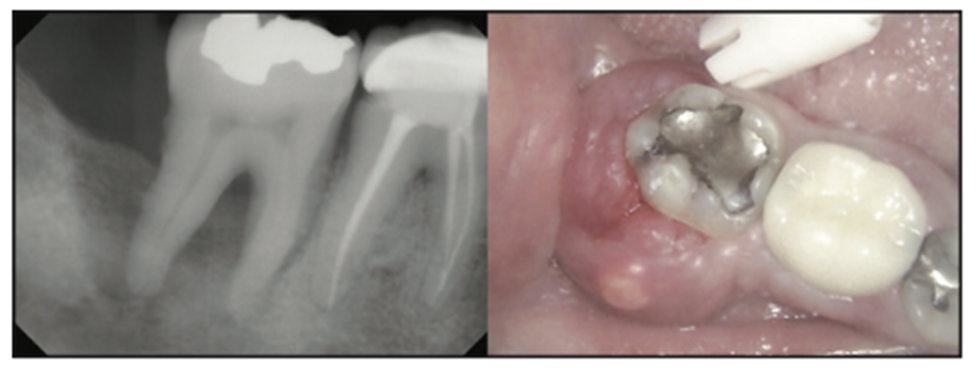
Figure 2. Composite photograph showing a digital radiograph and an intraoral camera image of a mandibular right molar. Because of the decreased image quality of the intraoral camera, this image is best suited for internal documentation.
Cameras
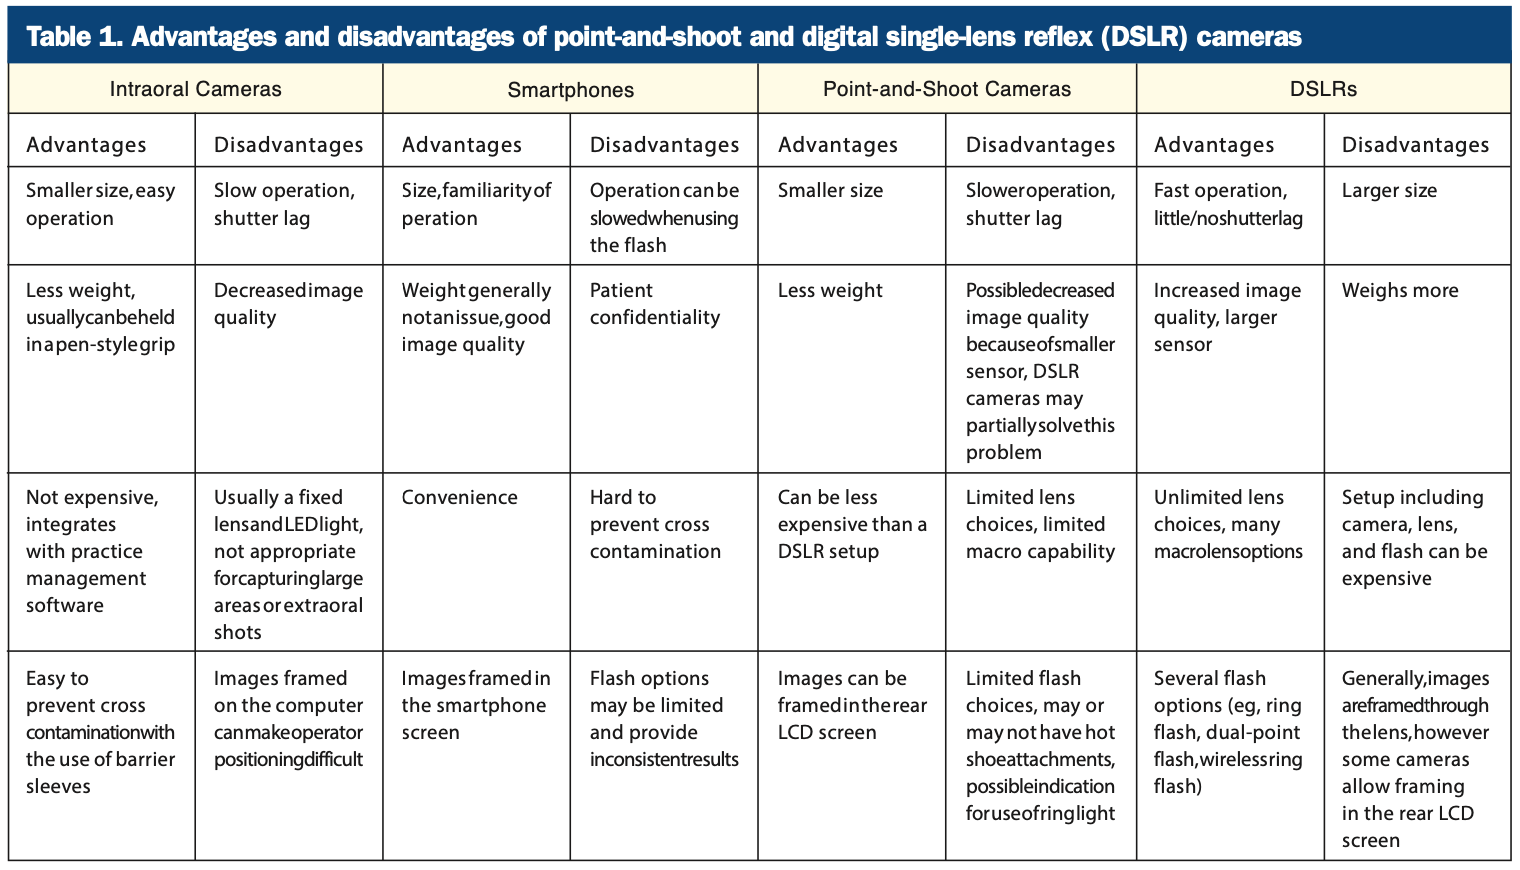
Digital cameras, such as point-and-shoot, DSLR, mirrorless interchangeable lens cameras, and even the cameras in smartphones become obsolete almost as fast as they are introduced into the consumer market. In 1999, the Nikon D1 DSLR was introduced, costing $5,000 and featuring a 2.7-megapixel sensor. Currently, many options for DSLRs exist from companies such as Nikon, Canon, Sony, and others across many budgets. In 2007, the first-generation iPhone had a 2.0-megapixel sensor, while the latest generation iPhone 13 Pro has 3 separate cameras offering 12 megapixels of resolution as well as macro and wide-angle views. Table 1 summarizes the differences between a typical DSLR camera and a typical point-and-shoot camera.
According to recent data, the camera market for point-and-shoot, DSLR, and mirrorless cameras is shrinking in response to the accessibility and quality of smartphone cameras.3-5 While using a smartphone to take dental images may be convenient, it may also be inadequate because of potential macro lens limitations, poor flash options, and the need for patient confidentiality.6 However, under certain conditions, smartphone use can provide acceptable images (Figures 3 and 4).7,8
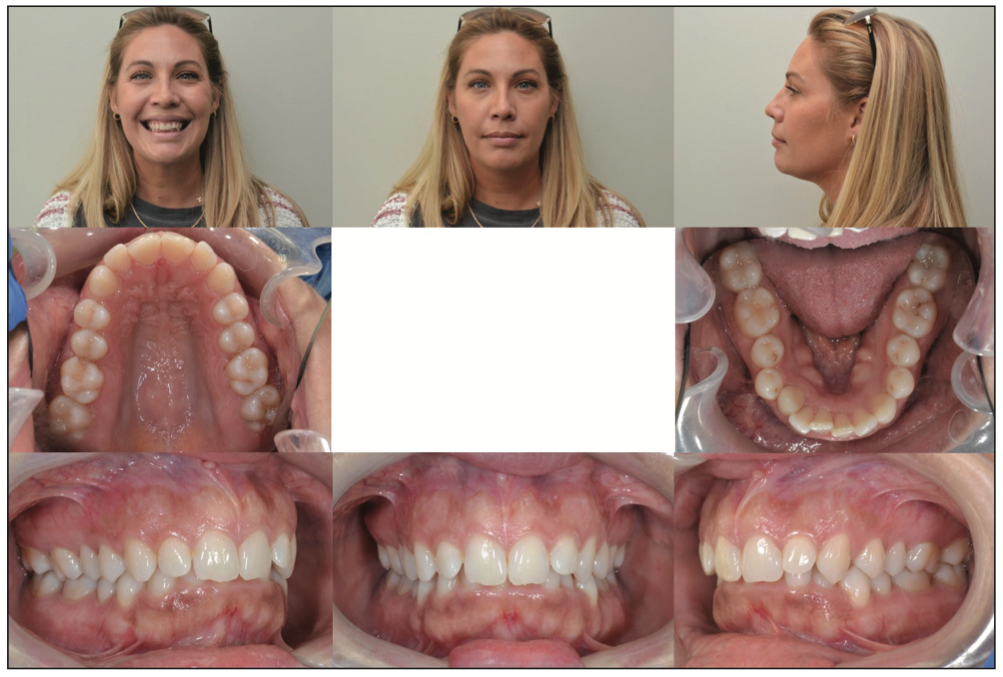
Figure 3. Composite photograph showing the 8 basic views captured with a DSLR, macro lens, and ring flash.
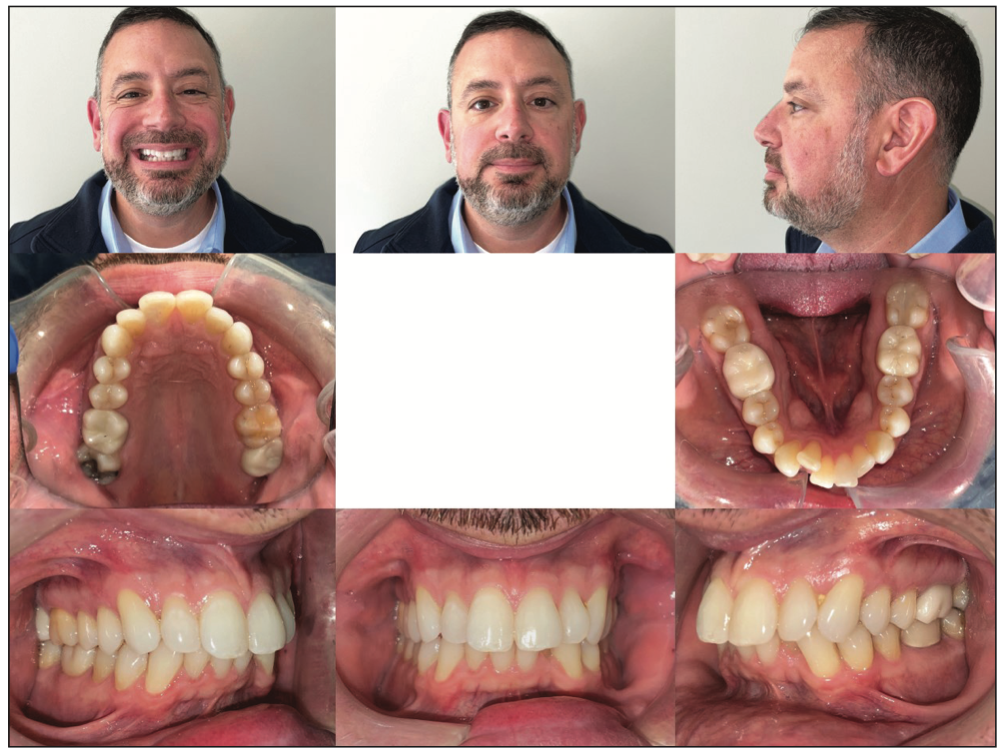
Figure 4. Composite photograph showing the 8 basic views captured with a smartphone.
Another hurdle to achieving high-quality images is maintaining infection control of the digital camera. While typically not a problem when using an intraoral camera because of the availability of disposable barrier sleeves, preventing cross contamination when using a smartphone, point-and-shoot, DSLR, or mirrorless camera can be a challenge. One example of a point-and-shoot camera that is designed to help maintain infection control is the EyeSpecial (Shofu Dental).9 Per the manufacturer’s website, the camera is specifically designed for the dental office, is water- and chemical-resistant, and can be easily operated with a gloved hand.
Lenses
Digital camera lenses intended for dental use, both intraoral and extraoral, must have one basic feature: the ability to focus up close (commonly referred to as macro focusing or close focus). Macro photography is close-up photography; the classic definition involves capturing an image on the film or digital sensor that is close to the actual size of the subject. For point-and-shoot cameras, the macro setting is usually denoted by the flower icon and enables the camera to focus on closer distances. Macro capability for DSLRs is a function of the individual lens chosen. Rather than listing a minimum focusing distance as with point-and-shoot cameras, macro capability is defined by the magnification, where 1:1 indicates that the object size captured on the digital sensor equals the actual life size. True macro lenses offer 1:1 magnification or greater. Two excellent examples are the Nikon AF-S VR Micro-Nikkor 105mm f/2.8G IF-ED and the Canon EF 100mm f/2.8 Macro USM.
Flashes
In addition to a ring flash, another option for macro dental photography is a dual-point flash system (Figure 1). Either flash system will provide acceptable results for dental images, and choosing one may be a personal preference. Ring flashes provide uniform, shadowless, and flat illumination; however, the disadvantages of a ring flash may be that surface texture and characterization are not easily captured and reflection on facial surfaces may occur. A dual-point flash is composed of 2 individual point flashes positioned at the front of the lens barrel. For creative control, one or both point flashes can be fired to produce a more 3D representation of topography and texture. The disadvantage of a dual-point flash is that images of posterior teeth can be more challenging.10-12
3. THE RIGHT VIEWS
The American Academy of Cosmetic Dentistry (AACD) proposed 12 standard extraoral and intraoral views for patient documentation.13,14 However, not all of the AACD views are needed or applicable for each patient. Clear aligner companies such as Invisalign and ClearCorrect require 8 basic extraoral and intraoral views for patient case submission, 6 of which are consonant with the AACD series.15,16 Table 2 compares the views for the AACD and those required by ClearCorrect and Invisalign.
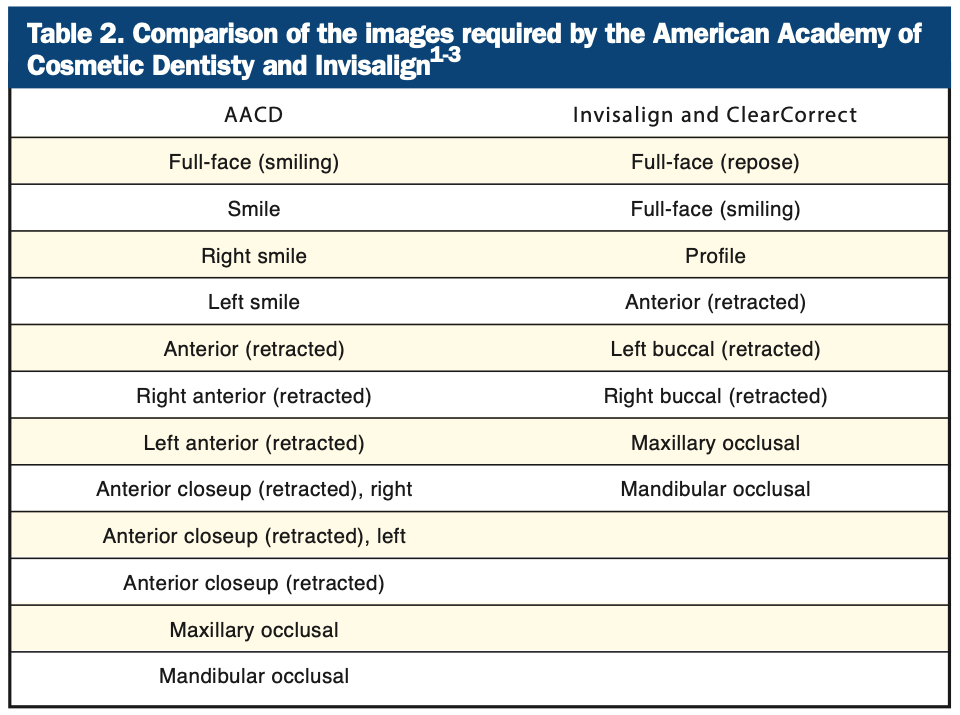
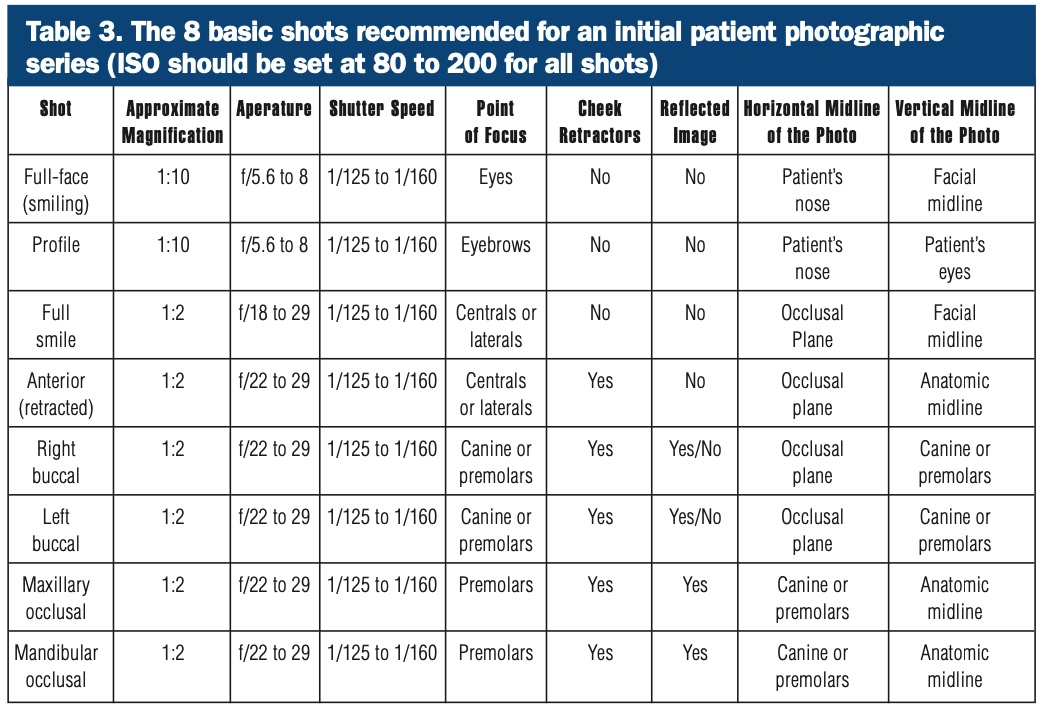
Each particular patient or clinical circumstance may dictate the need for a specific intraoral or extraoral image. In general, practitioners should capture 8 basic views to record a patient’s clinical condition during the initial patient visit (Table 3). Additional views may be captured as needed based on the treatment provided or the patient’s clinical findings; however, every clinician should know how to capture the 8 basic views adequately. Figures 3 and 4 compare 2 composite photographs using 2 different camera setups.
4. THE RIGHT POSITIONING TO GET THE RIGHT SHOTS
Before attempting to capture images, it is critical that both the camera and flash (if applicable) have charged batteries and that an appropriate memory card is inserted into the camera. General camera settings are listed in Table 3. Dental mirrors and cheek retractors should be clean and ready for individual patient use. In some cases, practitioners may choose to have a hot water bath available for heating the mirrors to prevent fogging. Also, it is very helpful to have an assistant available to help with holding retractors, blowing air on a mirror to avoid fogging, or other tasks requiring an additional pair of hands.
Shots 1 and 2: Full-Face, Smiling, and Repose
The full-face shot should be taken directly in front of the patient, against a solid-color, non-distracting background (eg, white, gray, or black). When possible, the operator and patient should be at the same height so that the resulting picture is not taken from below or above the patient’s eye level.11,17
The patient should exhibit a natural smile for this view, followed by the complimentary view of full-face at repose (ie, relaxation). To avoid shadowing behind the patient, ensure that the patient is not up against the background but slightly in front of it (Figures 5 and 6).
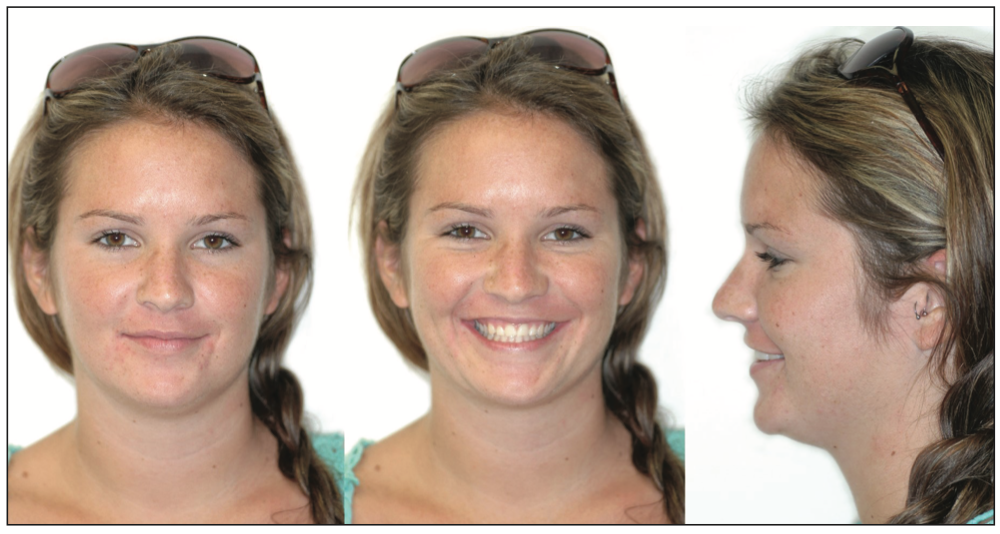
Figure 5. Example of repose, smiling, and profile, light background.
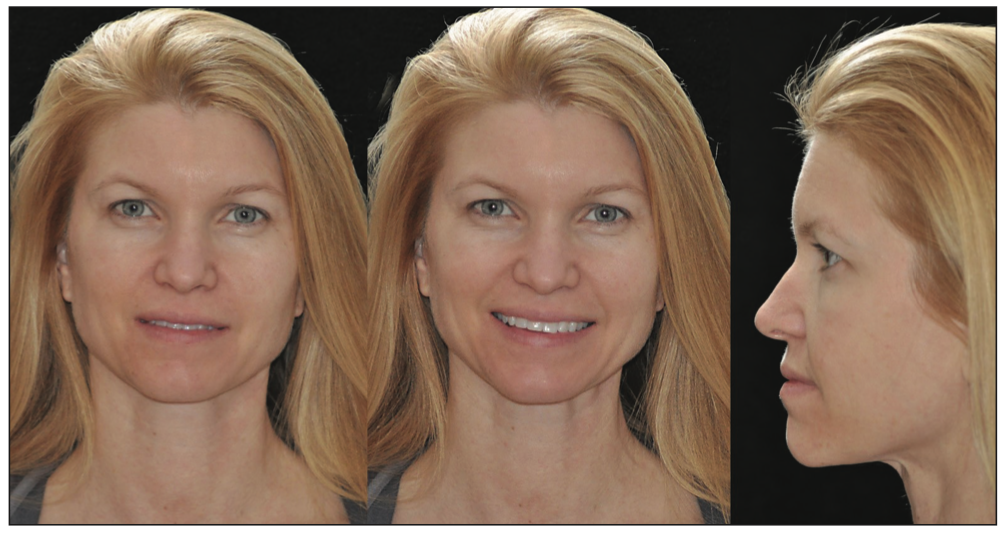
Figure 6. Example of repose, smiling, and profile, dark background.
Shot 3: Full-Face, Profile
The profile shot is accomplished similarly to the full-face shot, except with the patient turned 90° (Figures 5 And 6). The relative heights of the operator and patient should remain the same, and the camera settings are unchanged. It is recommended that the patient’s lips remain at rest; however, an additional view is the profile with the patient smiling.
Shot 4: Anterior (Frontal) View, Retracted
To achieve the retracted anterior (frontal) view shot, the patient should be seated in the dental chair with the operator standing in front of the patient (Figures 7 and 8). Cheek retractors must be used with the lips retracted outwards and away from the teeth. The teeth should be together in maximum intercuspation. Whenever possible, minimize the appearance of the cheek retractors in the image.
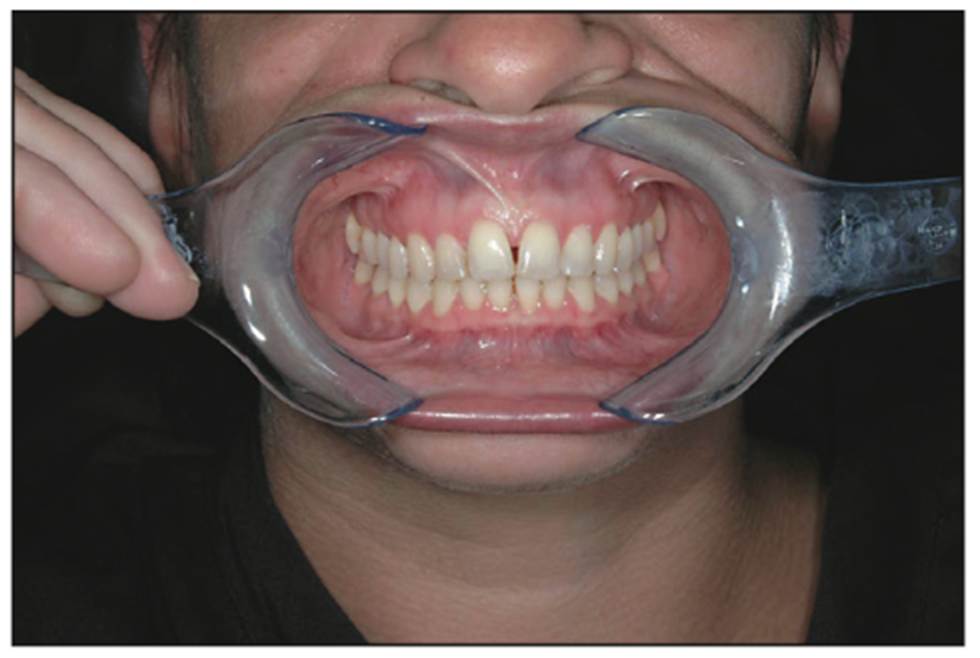
Figure 7. Positioning required for the anterior retracted view. The assistant or patient holds the retractors. Note that the retractors should be pulled outward instead of backward to ensure that the buccal soft tissue does not rest against the buccal surfaces of the tissue.
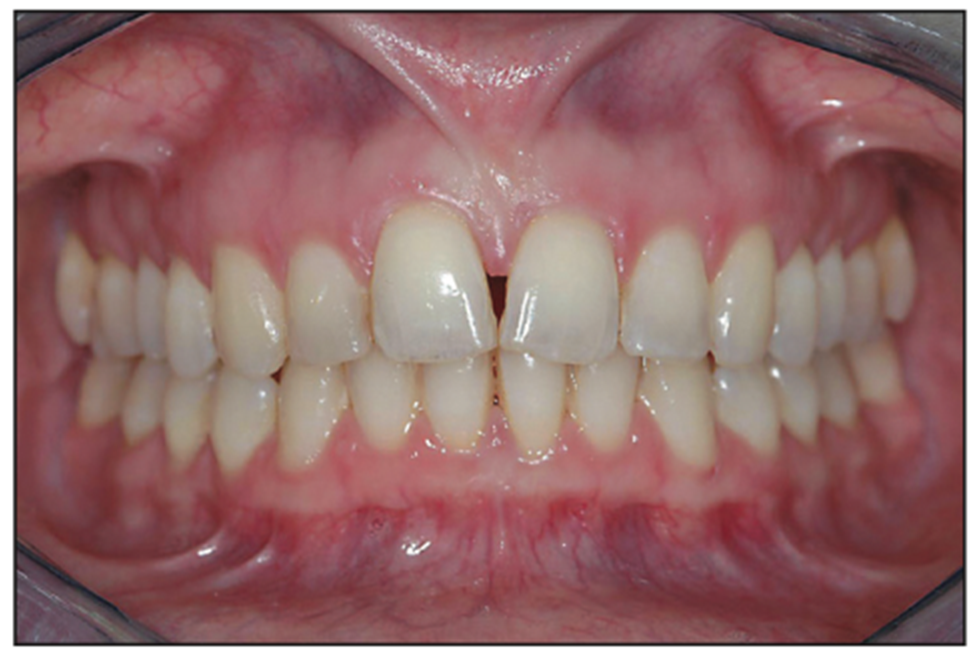
Figure 8. Example of an anterior shot using clear plastic cheek retractors.
Shots 5 and 6: Right And Left Buccal Views
The right and left buccal views are accomplished using the same patient and operator positions and camera settings as the frontal view. They can be achieved using a direct view with retractors or a reflected view with a buccal mirror (Mirror #1B).
For the direct method, place both cheek retractors and shift the retraction to the side being photographed. For example, if the right side is to be captured, the right retractor should be pulled out and away from the teeth while the left retractor is left slack and not pulled but simply holding the lips apart. Standard adult cheek retractors may be used; however, it is helpful to use buccal retractors to more easily capture all the teeth in the image. The difference between standard and buccal retractors is the shape: Standard retractors are U-shaped, while buccal retractors are V-shaped (Figure 9). The teeth should be in maximum intercuspation, and ideally, the canine and molar relationship should be visualized.
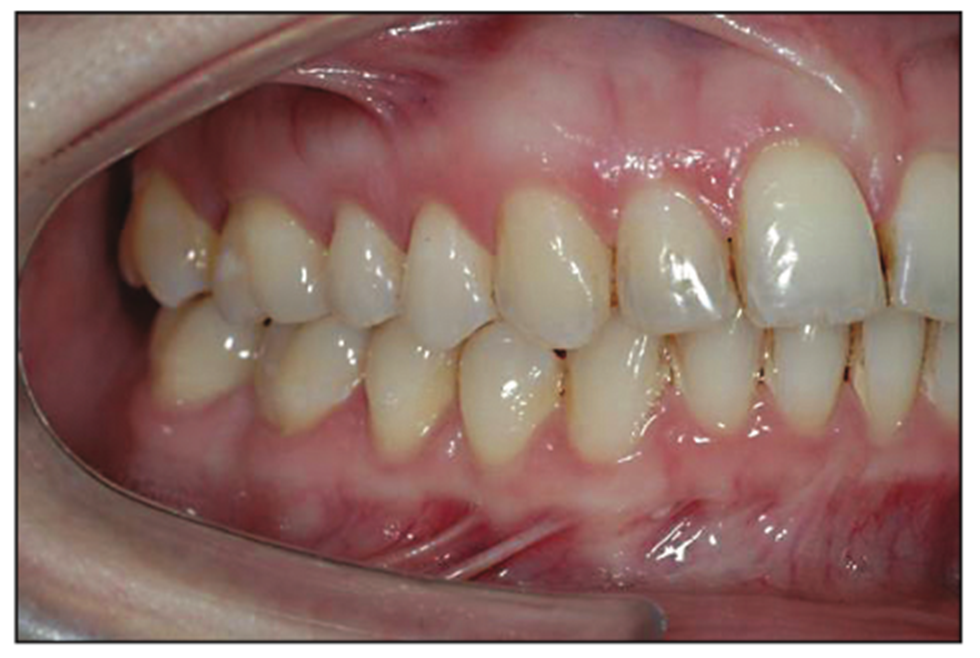
Figure 9. Buccal view using a clear plastic, V-shaped buccal retractor.
The buccal view taken with a mirror is a more technically difficult shot compared to the retracted buccal view. In this instance, a single cheek retractor is used for the contralateral side, and a buccal mirror is used to both retract the tissue and visualize the teeth on the side being photographed. The assistant or patient can hold the cheek retractor, but the operator holds the mirror. After the cheek retractor is inserted, ask the patient to open so that the mirror can be inserted. Once the mirror is outside the teeth, the patient should bring his or her teeth together. Advance the mirror so it is resting on buccal tissue behind the most distal tooth. At this point, the mirror should be pulled outward, so the end is not resting on the teeth, and rotated to visualize the arch (Figures 10 and 11).
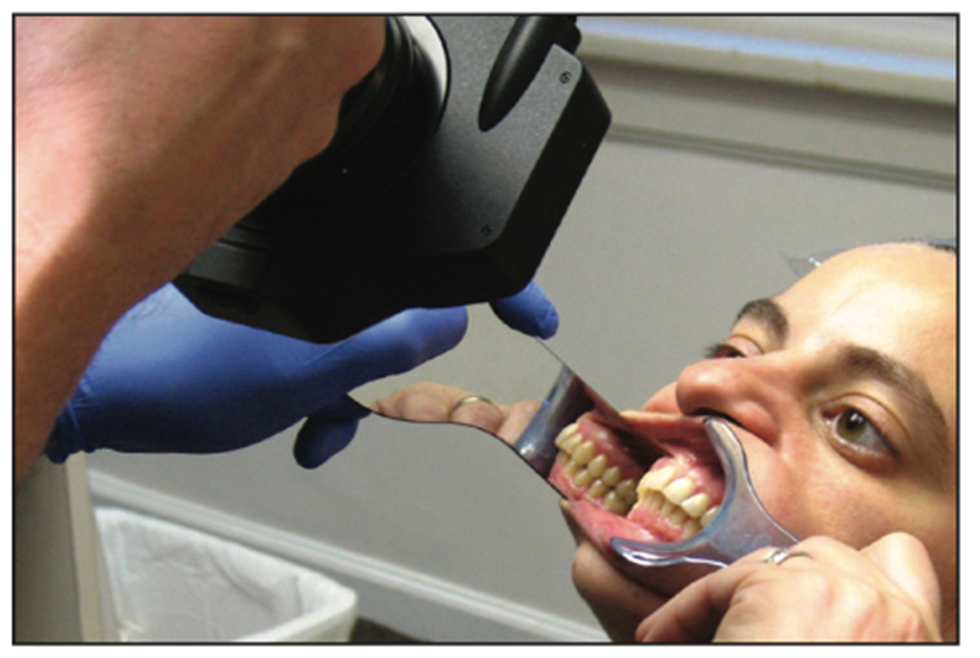
Figure 10. Positioning required for the buccal reflected view. The assistant or patient holds the retractor on the contralateral side. The operator holds the mirror. The photograph is taken in the mirror of the reflected buccal segment.
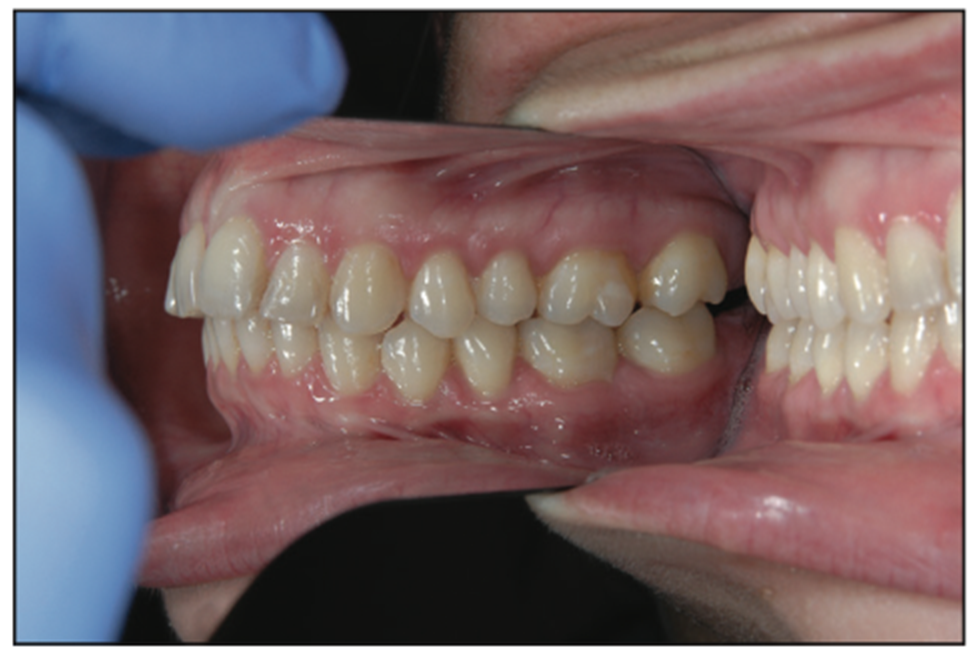
Figure 11. Close-up view of the position of the mirror used for capturing the buccal reflected view. Note the mirror is touching the soft tissue and retracted away from the teeth.
Shot 7: Maxillary Occlusal View
The maxillary occlusal shot is always taken with both retractors and an occlusal mirror (Figures 12 and 13). Critical to the success of this shot is the positioning of the operator and the patient. The patient should be reclined to approximately 45° and asked to raise his or her chin, and the operator should be in front of the patient. Camera settings are identical to the anterior retracted shot. Cheek retractors should be placed so that the lips can be pulled upward and outward; in some cases, the medial corners of the cheek retractors will touch the middle of the upper lip. When properly used, the cheek retractors will keep the buccal soft tissue and lips off of the teeth, allowing for proper visualization of not only the posterior teeth but the anterior teeth as well. In some cases, a single check retractor can be placed opposite the anterior teeth to retract the lip.

Figure 12. Positioning of the patient and the operator to capture the maxillary occlusal shot. Note the position of the cheek retractors upward and outward. Optimally, the angle to the mirror should be 45° to fully capture the teeth in the photograph.
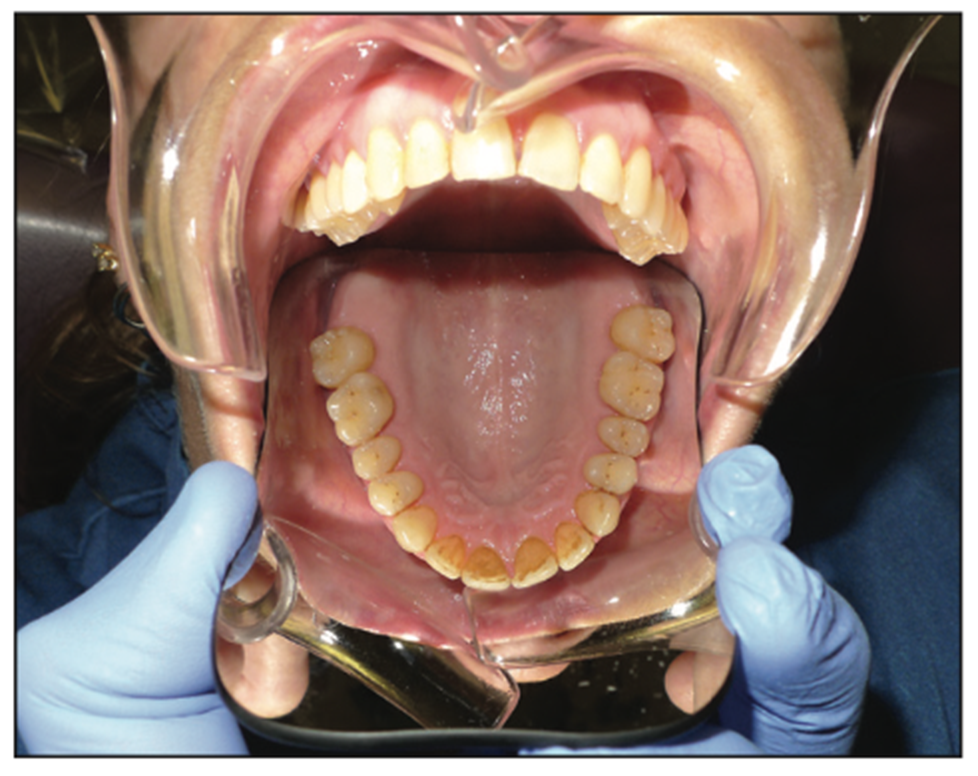
Figure 13. Wide view of positioning to capture the maxillary occlusal shot. Note the position of the cheek retractors upward and outward to pull the lips and soft tissue away from the teeth. The back of the mirror is behind the most posterior maxillary teeth.
The mirror should be inserted so that the edge extends behind the most posterior tooth. Rotate the mirror downward so that the back side is touching the lower incisor teeth. In doing so, the operator can help the patient open wide but also attain the 45° angle needed to properly capture the image.
Shot 8: Mandibular Occlusal View
The mandibular occlusal shot is accomplished with the same camera settings and similar positioning of the patient and operator as the maxillary occlusal view (Figures 14 and 15). The patient should be reclined at a minimum of 45° and should raise his or her chin as far as possible (neck extended maximally). Standard retractors (or a fork retractor) should be used to keep soft tissue and lips off of the teeth. If standard cheek retractors are used, they should be positioned to pull the lips downward and outward. Insert the mirror so that the end rests on soft tissue behind the most posterior teeth, making sure that it is not touching the teeth. Rotate the mirror upwards so that the back of the mirror is resting against the maxillary incisor teeth. The image should be taken at approximately 45° to the mirror.
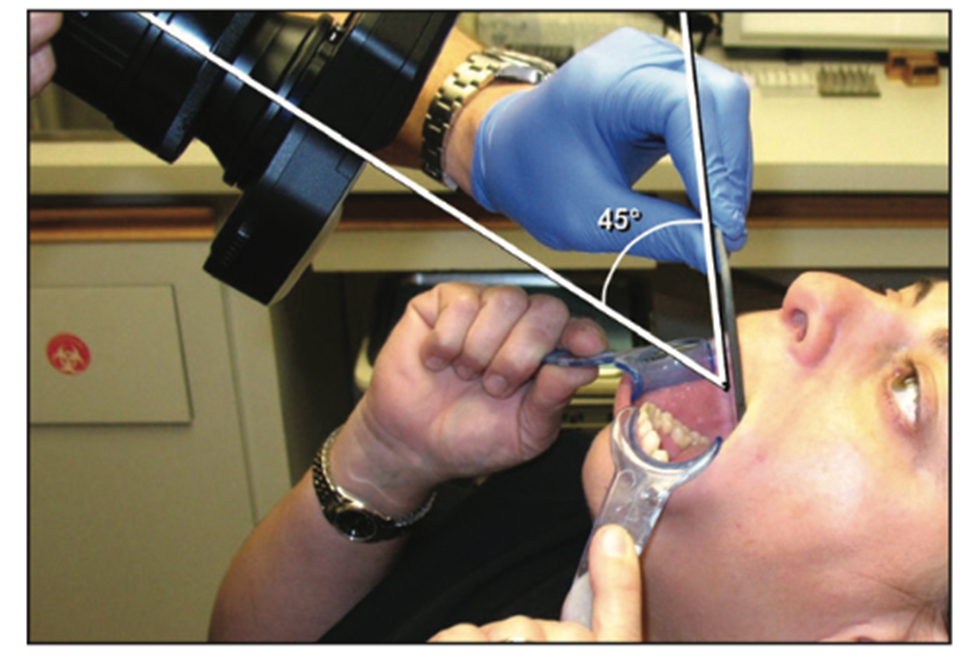
Figure 14. Positioning of the patient and the operator to capture the mandibular occlusal shot. Note the position of the cheek retractors which are pulled downward and outward. Optimally, the angle to the mirror should be 45° to fully capture the teeth in the photograph.
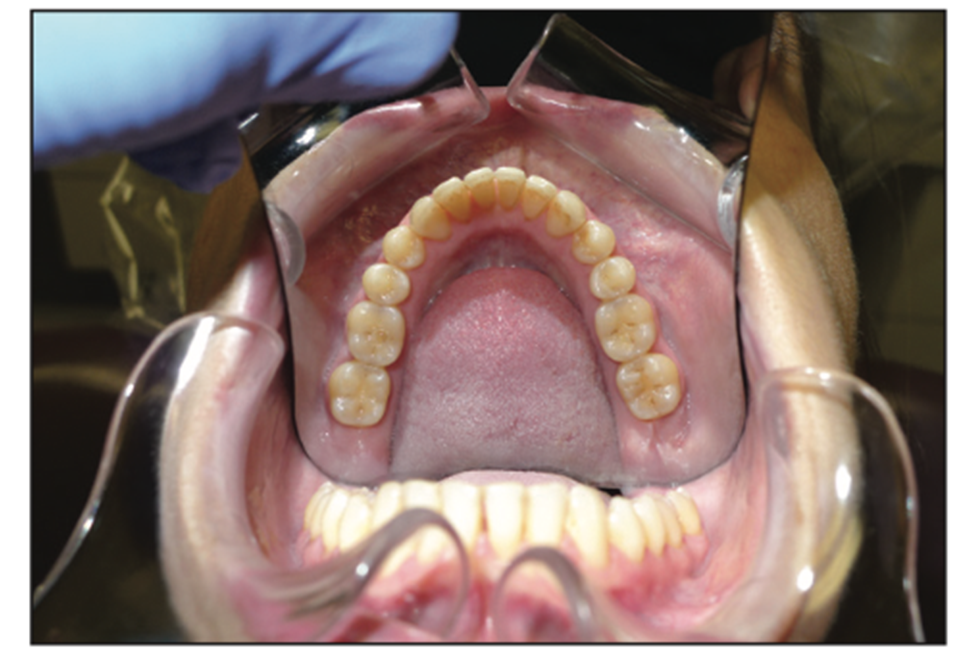
Figure 15. Wide view of positioning to capture the mandibular occlusal shot. Note the position of the cheek retractors downward and outward to pull the lips and soft tissue away from the teeth. The back of the mirror is behind the teeth and resting on soft tissue.
CONCLUSION
With easy access to many different digital camera systems, practitioners can now select the setup that best suits their practice needs. There currently exists multiple digital imaging tools to help patients visualize the current condition of their teeth and appreciate the results of treatment. Images created by a digital camera can be merged with optical scans and cone-beam computed tomography to help create better doctor-patient communication, improved treatment plans, and more predictable clinical outcomes.
The use of a digital camera is an essential part of everyday dental practice, and by using the strategies for the 8 basic views discussed, practitioners can consistently acquire excellent results for before/after photographs as well as for publishing, marketing, or any other purpose. Many other views can be obtained, from lingual views to extreme closeups on a single tooth. As practitioners learn how to capture images using good technique and positioning, adding additional views becomes easy.
REFERENCES
1. Yoo A. 10 reasons why dental photography should be an essential part of your practice. Dental Economics. September 30, 2014.
2. Goodchild JH, Donaldson M. Getting the right shots! Tips and tricks for consistent photographic excellence. Dent Today. 2013 Mar;32(3):112, 114–8.
3. Djudjic D. Camera sales report for 2016: lowest sales ever on DLSRs and mirrorless. DIY Photography. March 2, 2017.
4. Marsh A. No, smartphone cameras will never dominate the camera market. DIY Photography. June 1, 2021.
5. Guinness H. Camera sales are down, but the industry has survived similar slumps. Pop Photo. January 6, 2022.
6. University of Toronto Faculty of Dentistry. Camera recommendation for dental photography. March 2020.
7. Ravichandran D. How to use your mobile phone for dental photography. Dental Reach. September 2, 2021.
8. Moussa C, Hardan L, Kassis C, et al. Accuracy of dental photography: professional vs. smartphone’s camera. Biomed Res Int. 2021;2021:3910291. doi:10.1155/2021/3910291
9. Shofu Inc. EyeSpecial.
10. Terry DA, Snow SR, McLaren EA. Contemporary dental photography: selection and application. Compend Contin Educ Dent. 2008;29(8):432–6, 438, 440–2.
11. Ho C. Clinical photography: a picture can tell a thousand words. Dent Pract. 2004; 148–54.
12. Shorey R, Moore K. Clinical digital photography: implementation of clinical photography for everyday practice. J Calif Dent Assoc. 2009;37(3):179–83.
13. American Academy of Cosmetic Dentistry (AACD). A guide to accreditation photography—photographic evaluation and documentation in cosmetic dentistry. 2013.
14. Lowe E. Digital Photography—The American Academy of Cosmetic Dentistry (AACD) Series, Part 1. J Cosmet Dent. 2010;26(1):25-30.
15. Invisalign Quick Start Guide. Pictures.
16. ClearCorrect Support. Clinical Photos.
17. Fondriest J. Improving your portrait photography. J Cosmet Dent. 2008;24(1):66-73.
ABOUT THE AUTHORS
Dr. Goodchild is an associate clinical professor in the Department of Oral and Maxillofacial Surgery at the Creighton University School of Dentistry in Omaha; an adjunct assistant professor in the Department of Diagnostic Sciences at the Rutgers School of Dental Medicine in Newark, NJ; and vice president of clinical affairs at Premier Dental Products Company in Plymouth Meeting, Pa. He can be reached via email at jgoodchild@premierdentalco.com.
Dr. Donaldson is associate principal at Vizient Pharmacy Advisory Solutions in Irving, Texas. He is a clinical professor at the School of Pharmacy at the University of Montana, a clinical assistant professor at the School of Dentistry at Oregon Health & Sciences University, and an adjunct professor, faculty of dentistry at the University of British Columbia. He can be reached via email at drmarkdonaldson@gmail.com.
Disclosures: The authors report no disclosures.