Nikhil Sethi presents a case in which he provided convenient, durable and cost-effective direct composite overlays for a peripatetic patient.
The following case summary highlights the importance of trust and belief in our instruments, equipment and materials as dentists. Here, I chose to work with a composite material that I knew I could rely on to withstand extreme forces, for a patient with a history of parafunction. I was confident that, if engineered correctly, the occlusal restorations would remain strong for several years.
Patient presentation and examination
A middle-aged gentleman attended an appointment at Square Mile Dental Centre. He had three large amalgam fillings in the upper right 5, 6 and 7.
He was experiencing short, sharp pain chewing certain hard foods. The UR5 and UR6 were positive to cracks upon testing (Figure 1). The patient was a clencher and had previously been treated for cracks in other teeth.
The gentleman was about to depart on an overseas trip and would be away for several months. My aim, therefore, was to relieve his discomfort and make him pain free.
The ideal treatment options would have been either a temporary filling, a core filling that would need to be regularly monitored, or a porcelain crown.
Due to the patient’s imminent departure abroad, there was insufficient time to make a crown. Consequently, we agreed to provide direct composite overlays.
Treatment preparation
The amalgam fillings were removed and the main areas were prepared (Figure 2). I generally find it is not necessary to cut in closely at the point where the crack meets the dental pulp, it being usually sufficient to achieve a good peripheral seal.
The cuspal walls were reduced by between 1 and 1.5mm, in a method similar to crown preparation.
The teeth were isolated with rubber dam and air-abraded with 27 micron aluminium oxide powder. A 37% phosphoric acid etch gel was applied to prepare the enamel. The teeth were then washed and dried. For this case, I chose to use Bioclear bands and wedges and a Garrison sectional matrix band (Figure 3). A two-stage, self-etch bonding adhesive was placed and light-cured in accordance with the manufacturer’s instructions.
Next, a small amount of Kulzer Venus Diamond Flow was added to the base of the cavities to reduce surface tension and then light-cured (Figure 4). The material is ideal for lining cavities, particularly those hard-to-access areas. With its excellent viscosity, application can be highly controlled.
Areas of intense staining from the amalgams were blocked out using Venus Diamond Flow Baseliner.
Strength in extreme conditions
Kulzer Venus Diamond was selected for the direct composite overlays. When overlaying a cusp, this material is never likely to chip, even under extreme conditions, such as in this case where the patient habitually ground his teeth. The material is easy to manipulate and behaves really well in my hands.
Venus Diamond universal shade A3 was applied in a layered, freehand technique (Figures 5 and 6). The proximal walls were initially built up, followed by the base of the cavities. The overlays were created to rebuild each tooth cusp.
The basic anatomy helped to create perfect function and enhance the aesthetic effects. The anatomy was defined with Kulzer Venus Color Choco tint. Each increment was light-cured for 20 seconds and the final layer for 60 seconds. The rubber dam was removed, occlusion was checked with 20 micron articulating paper and adjusted with fine grit diamond burs. The restorations were polished with spirals.
Convenient, durable and cost-effective outcome
In this case, width, form and height had to be estimated when building the cavity walls. On reflection, I would perhaps have taken a preoperative putty index to help rebuild the height of the buccal and lingual walls, thereby eliminating some of the planning and treatment variables.
Nowadays, I also tend to adopt an injection-mould approach rather than adding composite in smaller increments.
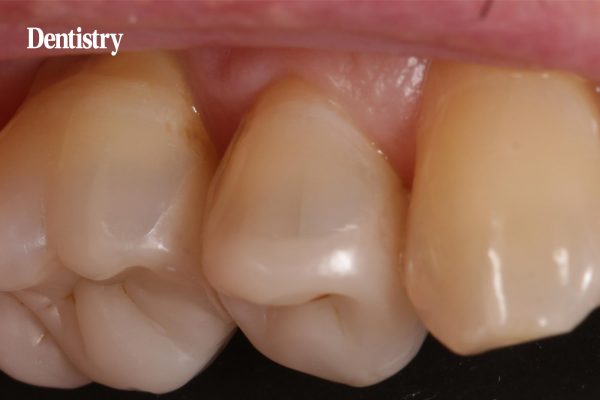
However, the restorations have stood the test of time and, in comparison to an onlay or crown, have provided a convenient, durable and cost-effective outcome for the patient (Figure 7).
In similar cases with patients prone to clenching and grinding, the restorations made from Venus Diamond are still working well after eight to 10 years.
At the six-month review appointment, the gentleman reported no pain when chewing hard foods. There were no obvious signs of further cracking and the examination revealed a very good performance in occlusion (Figure 8).
We therefore concluded that at this point there was no need for ceramic restorations, although the option of replacing the direct composite overlays with crowns is available, should this be required in the future.
This article was originally commissioned for Dentistry magazine. You can read the latest issue of Dentistry magazine here.


