

INTRODUCTION
The subperiosteal implant is a custom-fabricated titanium framework. It is designed to rest on top of the mandibular bone, under the periosteum, and it is stabilized by a combination of fibrous tissue and bone support.1 Peri-mucosal extensions provide for support and attachment of the prosthesis. The need for subperiosteal implants arose due to the failure of removable mandibular dentures to provide adequate function for the debilitated patient.
The use of subperiosteal implants has steadily declined in the last 10 years in favor of endosseous dental implants. Although these patients may be able to have endosteal implants in the anterior section, an RP-4 restoration may be compromised by an arch shape that provides a very small anterior-posterior spread, thus creating a large cantilever, and a poor implant/restoration height will create an increased chance for peri-implantitis.2
Another reason to use subperiosteal implants is the time required to complete the case. The subperiosteal implant-supported overdenture will have a stable prosthesis on the day of surgery, as opposed to an endosteal-supported overdenture, which will take up to 5 months to complete.
The first subperiosteal implants performed by Gershoff and Goldberg were not produced from a direct bone impression. A soft-tissue impression was taken, and then a master model was poured and scraped according to the discretion of the clinicians’ imagination of their manual manipulation and a review of the radiographs. The patient only needed to have one surgery. Screws were used to stabilize the implant. Unfortunately, this implant failed.3
Drs. Isaiah Lew and Nicholas Berman developed the 2-phased surgical procedure in 1951. The first surgery exposes the mandibular bone, and a direct impression is taken of it. At the same time, a bite registration is taken that records the distance from the crest of the mandibular ridge to the occlusal plane of the maxillary arch. The substructure is fabricated by the dental laboratory. In the second surgery, the implant is inserted, which has a precise adaptation to the mandible. The temporary prosthesis is seated at the time of the second surgery.4
CBCT subperiosteal implants were first developed by Kay et al5 to eliminate the second surgery by fabrication of an exact replica of the mandible. The initial CTs were medical-grade machines, which produced excess radiation, and the resolution was very inaccurate compared with present day CBCT scanners, which produce minimal amounts of radiation.
The prosthetic technique of choice for the complete subperiosteal implant is an RP-4 overdenture. Centric and vertical relationship records are utilized from previous dentures. Duplicate dentures are fabricated using putty stints of the intaglio surface and opposing surface. Denture try-in is then accomplished to make necessary changes for optimum aesthetics and function.
CASE REPORT
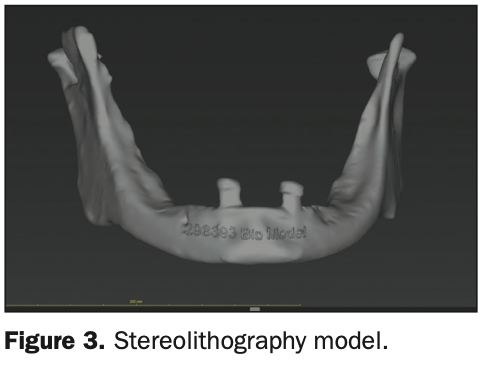
A 69-year-old female presented to the office for an implant consult. Her primary concern was a loose mandibular LOCATOR overdenture, which made it difficult to function and placed pressure on the mental nerve, creating a tingling sensation. The patient had 2 implants placed mesial to the mental foramen (Figure 1). It was a traditional maxillary denture with an incorrect vertical, which showed resulted in too much gingival display (Figure 2). Records taken included health history, CBCT (Figure 3), duplication of her existing maxillary and mandibular dentures, a bite registration, and photographs (ie, the American Academy of Cosmetic Dentistry series of photos).
The patient presented with a complex medical condition requiring consulting with both an endocrinologist and her primary care physician. The prosthesis of her mandibular case was an RP-5 with a poor A-P ratio and a C-h mandible that created lateral rotation.6
The treatment plan consisted of the following:
1. A stereolithography model would be fabricated, created from the CBCT (DDX) fabrication of the model (Figure 3).
2. The outline would be drawn for the laboratory to fabricate a titanium subperiosteal implant. The laboratory would then be able to make a temporary overdenture to fit an O-ring-retained overdenture that would be an RP-4 design.
3. A new maxillary denture would be created to improve aesthetic and vertical aspects as this would be completed prior to surgery.
4. Implant placement surgery would be performed utilizing a 10,600-nm CO2 laser (Great Plains Technologies) to prevent bleeding,7 which would be created by use of a Bard Parker. Decortication of the mandibular ridge with the use of an erbium laser (Biolase) would allow bone to integrate around the struts of the subperiosteal implant. Plasma-rich fibrin (PRF) would be used to cover the struts, along with the placement of Bio-Oss (Geistlich Pharma North America) to protect strut exposure during healing. Photobiomodulation (PBM) would be used to aid in healing and to decrease postoperative pain.8
5. The permanent subperiosteal overdenture would be completed after one month of healing of the soft tissues.
6. The final step would be prosthetic fine-tuning and oral hygiene maintenance.
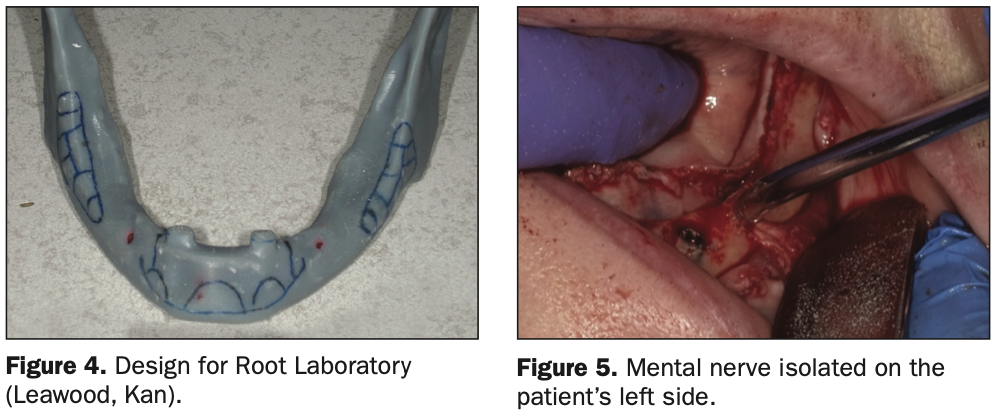
The stereolithography model (Figure 4) shows how the implant was designed for Root Laboratory (Leawood, Kan) to fabricate the implant. The implant was autoclaved prior to surgery, and all necessary equipment was on hand. On the day of surgery, blood was taken from the left antecubital fossa for the production of PRF using vena-puncture with a butterfly technique. The patient’s baseline vital signs were blood pressure (BP): 173/61 mmHg, left arm, sitting; respiratory rate: 17 breaths per minute; SpO2: 97%, with no O2 via cannula even though it was placed during the start of sedation; average heart rate of 62; and Mallampati: II. A 22-gauge peripheral venous cannula was secured in the right antecubital fossa. The patient initially received 4 mg of midazolam (with incremental doses for a total of 10 mg), 25 mcg of fentanyl (the total also was 25 mcg), and 20 mcg of dexmedetomidine (total dose of 30 mcg). The patient then received 80 mg of lidocaine with 20 mcg of epinephrine and 40 mg of marcaine with 10 mcg of epinephrine.
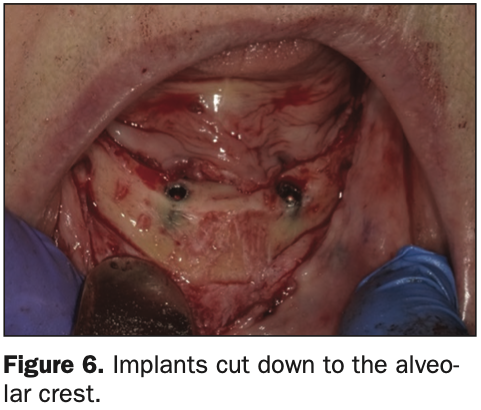
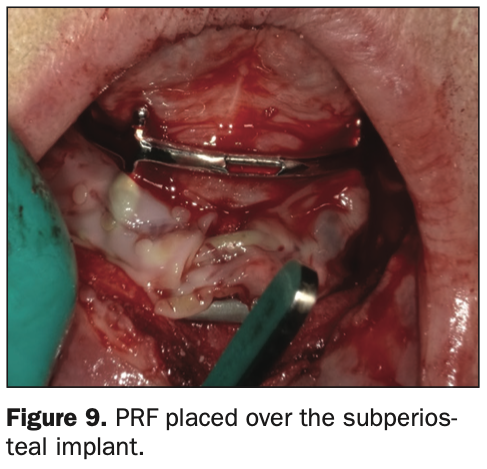
Flap reflection was performed from the left retromolar pad to the right retromolar pad with the use of a 10,600-nm CO2 laser at 70 Hz for about 10 minutes to get blood-free release with releasing incisions lateral to the retromolar pad on each side and in the symphysis area to get reflection. The mandible was degloved to the angle of the mandible and to the inferior portion of the symphysis. The mental nerve was isolated on each side (Figure 5). A purse-string suture was tied with a 4.0 silk suture for the elevation of the lingual tissue. Implants were cut off to the alveolar crest (Figure 6). The subperiosteal implant was seated by placing the left strut first and then seating the right strut as the symphysis seated completely.
The subperiosteal implant was initially fixed with Lew’s screws in each posterior strut and in the symphysis; this was accomplished with a surgical handpiece (Figure 7). The erbium laser was then used to decorticate bone to create bleeding points9 and create the regional acceleratory phenomenon.10 Bio-Oss was placed over the struts, which were soaked with plasma from PRF (Figure 8). PRF membrane was then placed over the struts (Figure 9), which were then closed with 3.0 PTFE sutures. PBM was used in large muscle areas of the mandible (buccinator, mentalis) with 12 J of energy and then 6 J of energy on the lymph nodes (submandibular and subclavicular).

Postoperatively, the patient called 2 days later after starting her blood thinners and reported having experienced bleeding from the surgical sites. The patient was seen in-office, as blood was oozing from the closure lines. Astringedent X (Ultradent Products) was rubbed into the sites, and 4 × 4 gauze was placed. Bleeding stopped after 40 minutes; vitals were taken as the patient was feeling lightheaded. Two liters of oxygen were administered with a nasal cannula (BP: 141/52, SpO2: 98). After 15 minutes, the patient felt better, even though her vitals remained consistent with her initial readings. The patient was escorted out of the office via wheelchair.
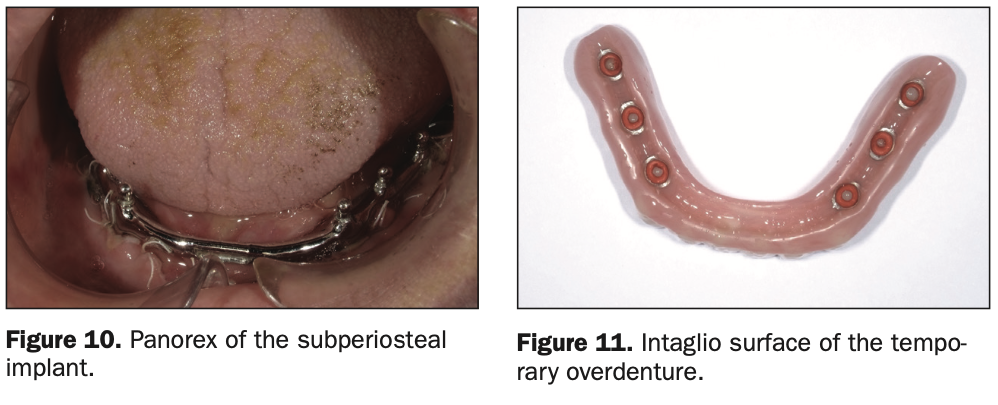
The patient attended another post-op visit after 3 days. She had experienced no further episodes of bleeding from surgical sites, and the area looked to be healing very well (Figure 10). The patient was changed from saltwater rinses to peroxide and water use with a Q-tip. A temporary overdenture was seated, and necessary adjustments were made to the occlusion as the design was high water to prevent tissue irritation (Figures 11 and 12).

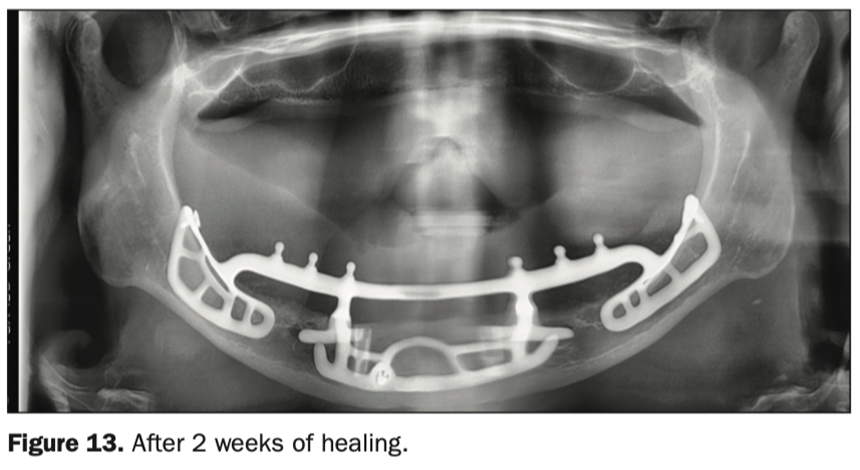
A panorex was taken to verify the seating of the implant (Figure 13). PBM was again completed, this time with 6 J in all areas.
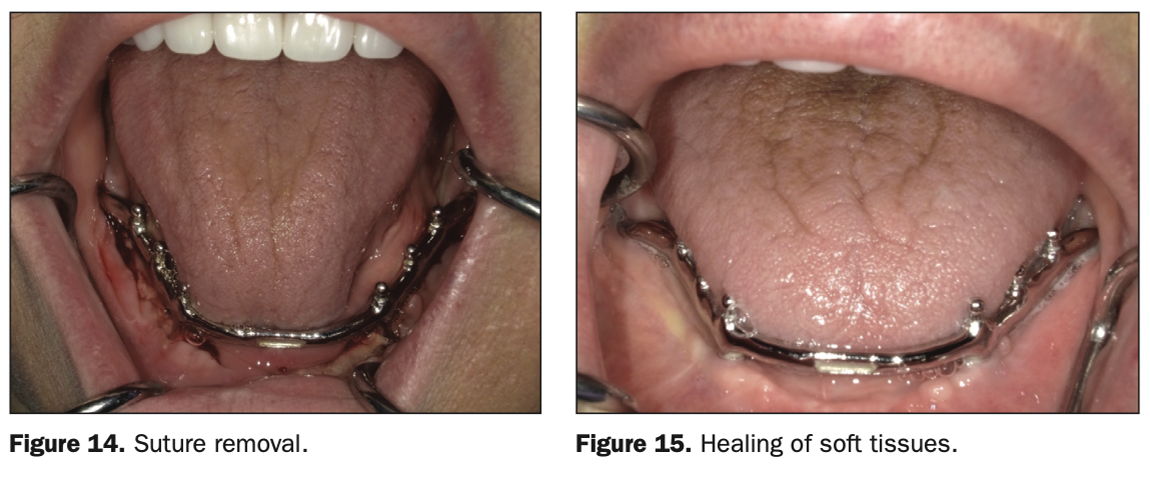
The patient attended a post-op visit 7 days later to remove sutures. Healing was excellent, and there was minimal bleeding upon removal of the sutures (Figure 14). The patient had not been cleaning the superstructure correctly; plaque and calculus were removed, and instructions for proper cleaning were given. The patient was given an Oral-B electric toothbrush and Hydro Floss. PBM was reapplied as consistent with the previous appointment. The next visit was scheduled to take an impression of the mandible for completion of the final mandibular overdenture (Figure 15).
Two weeks later, a duplicate of the temporary overdenture was made, the impression was taken using Aquasil (Dentsply Sirona) with a Massad denture tray (Ransom and Randolph), and a liquid rubber dam was placed in areas of possible undercuts. Green heavy body was completed first, and then the tray was relieved to prevent tray perforation. This was followed by the use of Monophase material (Dentsply Sirona). The impression captured muscle attachments. An impression was taken of the new maxillary denture.
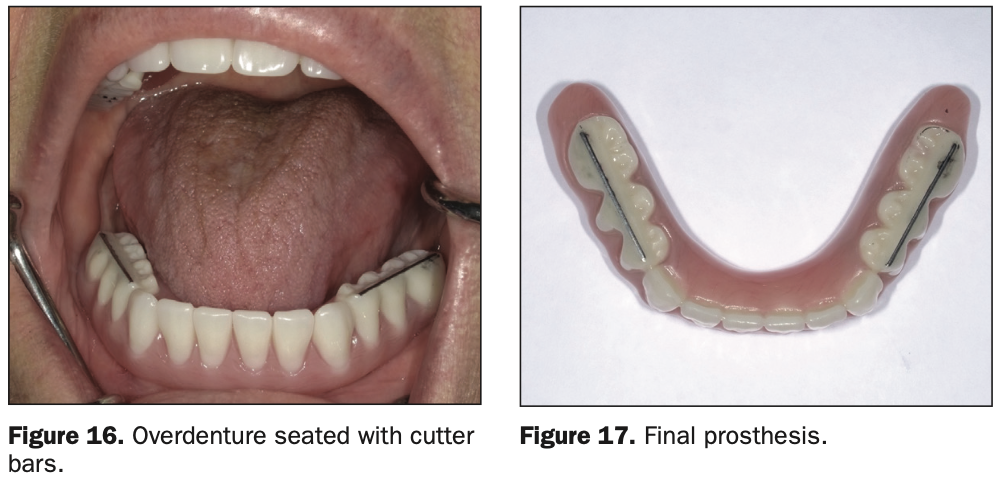
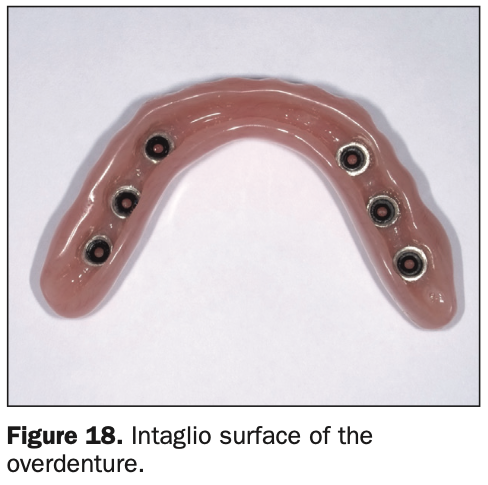
Three weeks later, the lower overdenture was tried in. The patient thought the try-in felt more comfortable than her temporary overdenture. Bite registration was taken with Regisil material (Dentsply Sirona). The final seating was scheduled for 3 weeks later, and at this appointment, the mandibular overdenture was seated, and only minor adjustments were needed (Figures 16 to 18). The patient was scheduled for maintenance appointments, first in 2 weeks and then in 3 months.
The patient’s recurrent visits were just for minor occlusal adjustments and regular maintenance, which has improved.
CONCLUSION
The subperiosteal implant is technique-sensitive and is not taught in many educational avenues anymore. For the severely resorbed mandible, it continues to be a great implant and thus a great restoration with the use of an overdenture that is totally implant-supportive. I hope this article will attract interest in this segment of implant dentistry.
REFERENCES
1. Cranin AN, Klein M, Simons A. Atlas of oral implantology. George Thieme Verlag; 1993.
2. Misch CE. Contemporary Implant Dentistry. 2nd ed. Mosby; 1993.
3. Garefis PN. Complete mandibular subperiosteal implants for edentulous mandibles. J Prosthet Dent. 1978;39(6):670–7. doi:10.1016/s0022-3913(78)80078-x
4. Sconzo J. The complete mandibular subperiosteal implant: an overview of its evolution. J Oral Implantol. 1998;24(1):14-15.
5. Kay JF, Golec TS, Riley RL. Hydroxyapatite-coated subperiosteal dental implants: design rationale and clinical experience. J Prosthet Dent. 1987;58(3):339–43. doi:10.1016/0022-3913(87)90053-9
6. English CE. Prosthodontic prescriptions for mandibular implant overdentures–Part II. Dent Implantol Update. 1996;7(5):38-40. https://pubmed.ncbi.nlm.nih.gov/9525182/
7. Campos FHO, Ferreira LB, Romano MM, et al. Immediate laser-induced hemostasis in anticoagulated rats subjected to oral soft tissue surgery: a double-blind study. Braz Oral Res. 2018;32:e56. doi:10.1590/1807-3107bor-2018.vol32.0056
8. Kuffler DP. Photobiomodulation in promoting wound healing: a review. Regen Med. 2016;11(1):107–22. doi:10.2217/rme.15.82
9. Kusek ER. Immediate implant placement into infected sites: bacterial studies of the Hydroacoustic effects of the YSGG laser. J Oral Implantol. 2011;37 Spec No:205–11. doi:10.1563/AAID-JOI-D-10-00014
10. Kusek ER. Use of the YSGG laser in dental implant surgery: scientific rationale and case reports. Dent Today. 2006;25(10):98, 100, 102–3. https://pubmed.ncbi.nlm.nih.gov/17058396/
ABOUT THE AUTHOR
Dr. Kusek graduated from the University of Nebraska Dental School in 1984. He is a Diplomate of the American Board of Oral Implantology and a Fellow of the American Academy of Implant Dentistry (AAID). He has Mastership in the Academy of Laser Dentistry (ALD) and the AGD. Dr. Kusek is a past president of the ALD, the current vice president of the AAID, and an adjunct professor for the University of Nebraska Dental School and in the University of South Dakota’s dental hygiene program.
He can be reached at (605) 371-3443 or via email at info@drkusek.com.
Disclosure: Dr. Kusek lectures for and receives honoraria from Ultradent Products.