

INTRODUCTION
In 2021, Mijiritsky et al,1 including other well-known clinicians like Dr. Scott Ganz, published the largest retrospective study on guided surgery, called “Variety of surgical guides and protocols for bone reduction prior to implant placement: a narrative review.” It details the largest review study, dating back from 1988 to 2020 and compiling every surgical guide design with bone reduction and the advantages of guided surgery. The paper presents several compelling benefits of a guided approach in full-arch surgery over conventional freehand approaches, such as decreased treatment time, greater accuracy in placement, and more consistent results in the final prosthesis. The present authors have demonstrated similar findings in a previously published paper documenting the before and after results of full-arch surgeries performed with surgical guides vs without surgical guides.2
Currently, numerous companies in our market design and print bone reduction guides, but these generally come at a much higher cost than simple single-tooth surgical guides. The process is a straightforward one. Most clinicians already take the time to obtain a CT scan and virtually position all the implants within the jaw in viewing software, and there are only a few more steps required to generate a bone reduction guide. This raises the question: Why not just design and print the guide in-house? This presents many advantages, such as drastically decreased cost, fast turnaround time, and greater control over the process.
The key to any full-arch case is to start with the ideal smile in mind. Only after the ideal tooth positions have been established should implant planning begin. For edentulous patients who already have nice-looking smiles/dentures with stable occlusions, start by performing a dual-scan protocol (Figure 1). If the existing dentures are not acceptable, it is important to modify or remake them to achieve proper VDO, aesthetics, occlusion, and fit of the existing denture(s) (Figures 2 and 3). For dentate patients, a CT scan, as well as intraoral scans, must be obtained. In the authors’ experience, it is important that both the CT and IOS be taken in centric occlusion at the desired final VDO. This step will significantly help achieve a proper digital tooth setup and helps ensure that the final prosthesis has adequate interarch space.
Figure 1. Dual-scan protocol: CT scan a denture with 5 radio-opaque glass beads, then CT scan the patient wearing the denture in full occlusion with those same beads in the denture (Dentalmark).
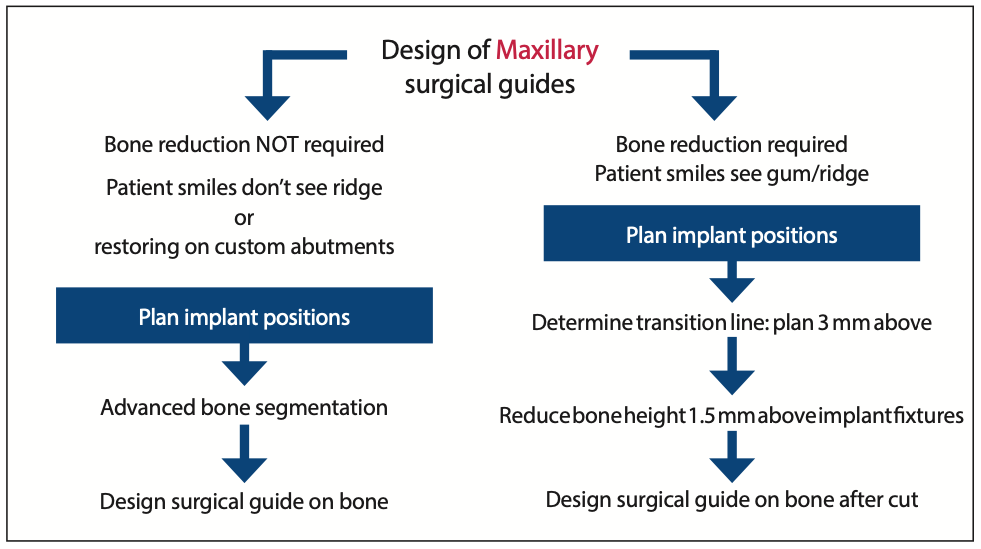
Figure 2. Workflow of maxillary surgical guide design.
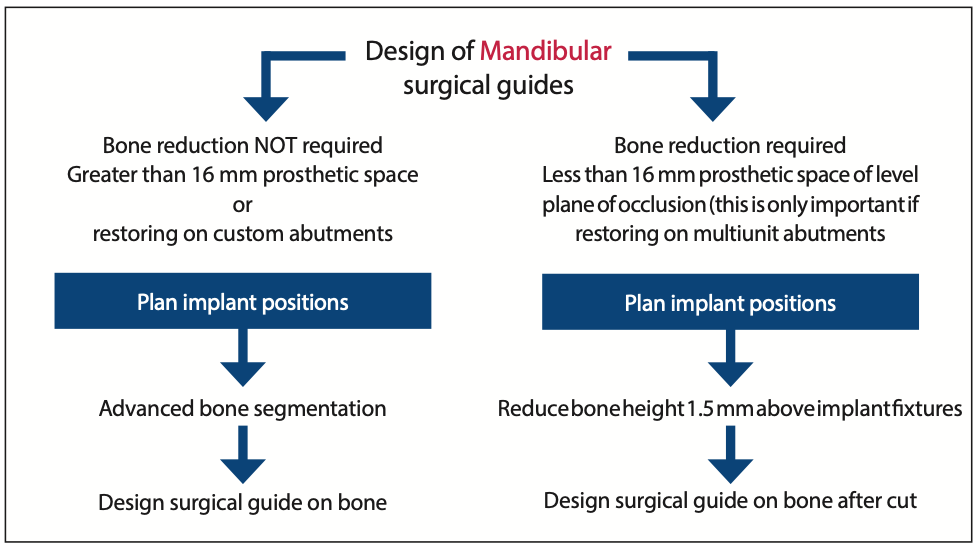
Figure 3. Workflow of mandible surgical guide design.
This article aims to show how to plan, create, export, and print surgical guides predictably for advanced full-arch implant surgeries where bone reduction is necessary.
STEP-BY-STEP PROCESS FOR GUIDE DESIGN
1. Acquire CBCT scan DICOM data (PreXion).
a. Denture: Use a dual-scan protocol, which describes a 2-step CBCT scanning process. A minimum of 5 glass beads are placed on the denture before CT scans are obtained first of the denture and secondly of the patient wearing the denture. They are required for edentulous patients (Figure 3). An example is Dentalmark beads, as they are optimized for stitching the denture scan to the patient scan into in digital planning software. This assumes that the denture’s fit, aesthetics, and VDO(s) are correct.
b. Dentate: The scan is taken in maximum interposition when there is acceptable occlusion and VDO. When a patient presents with improper occlusion, the scan should be taken in centric occlusion at the proper VDO.
2. A full-face smiling and a full-face retracted photo should be taken. These images are an important reference during the planning stages to recall if a patient has a high smile-line, visualize future prosthetics, and understand if bone reduction is even necessary.
3. Combine the DICOM data of the patient’s anatomy with the DICOM data of the denture or the intraoral scans in Blue Sky Plan (Blue Sky Bio). The data will generally merge automatically but can be done manually when required (Figure 4).
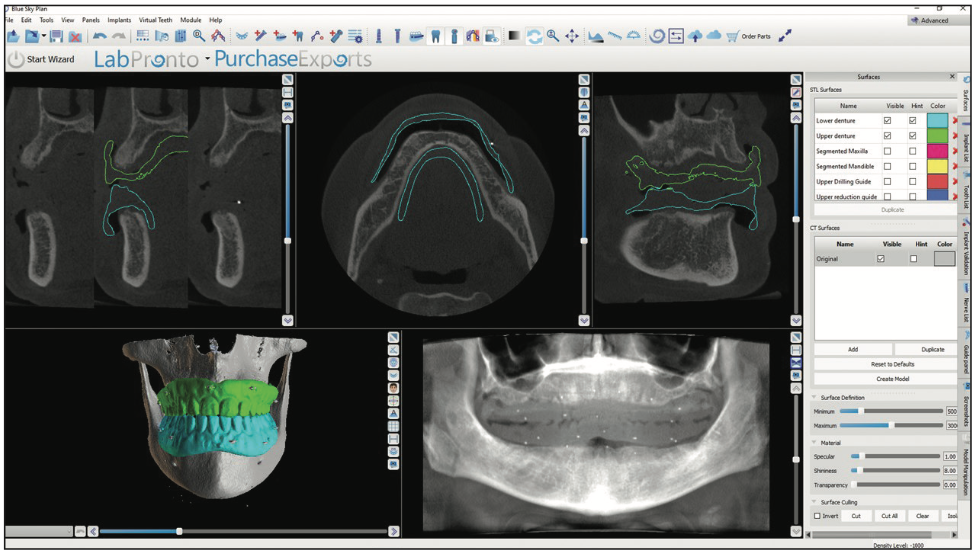
Figure 4. After stitching DICOMs of the upper and lower dentures, this is what it should look like in the software (Blue Sky Plan [Blue Sky Bio]).
4. Map the mandibular nerves for the lower arch (Figure 5).
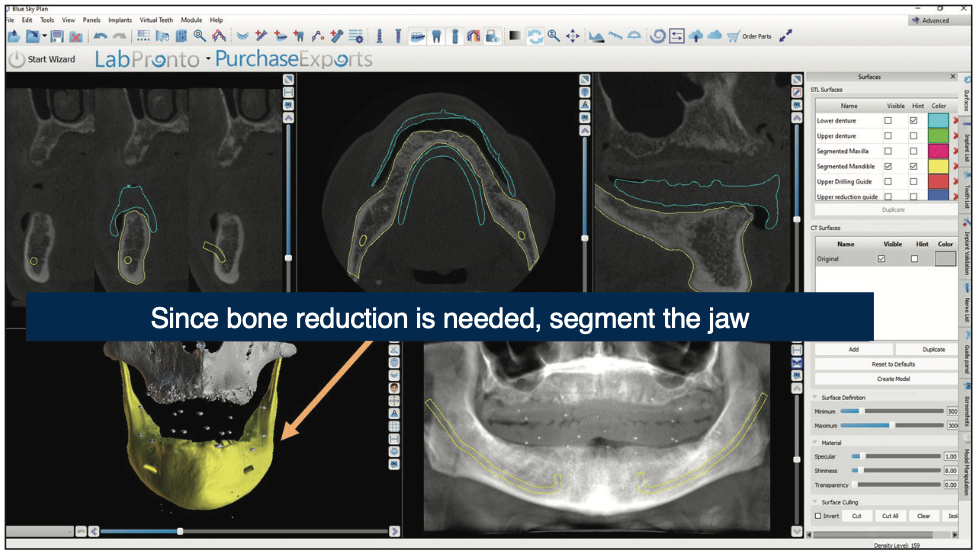
Figure 5. Tracing the mandibular nerve will cause it to show up in all images to view before planning implants (Blue Sky Plan).
5. Place implants in desired locations, taking into consideration available bone, prosthetic space requirements, and implant trajectories relative to the ideal tooth positions (Figure 6). In the case of a hybrid denture, 15 to 17 mm should be allowed from the ideal tooth to the implant platform (Figure 7).
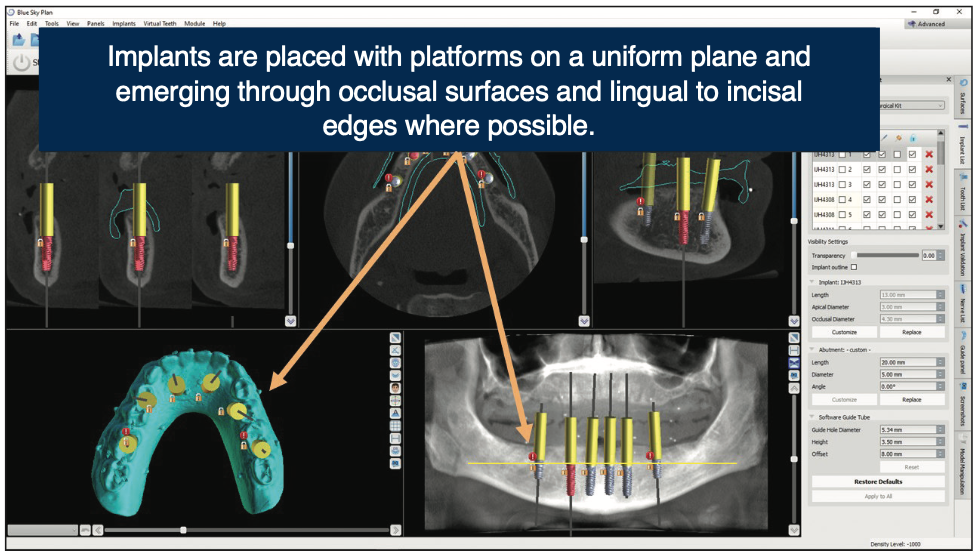
Figure 6. Ideally, implants should be placed parallel with proper anterior-posterior spread to avoid cantilevers (Blue Sky Plan).
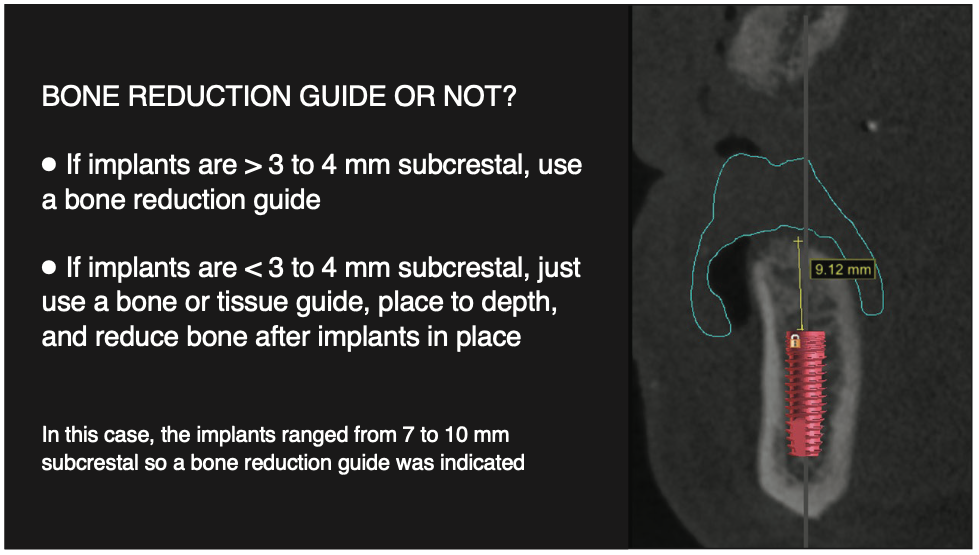
Figure 7. Cross-sectional view with superimposed prosthetics turned on to show depth of implant placement. Seeing implant depth vs bone crest in this view will help determine the proper amount of bone reduction.
6. Ideally, implants are placed with proper A-P spread to avoid cantilevers
a. For overdenture cases, adjust the implant trajectories to be as parallel as possible in the arch.
b. For fixed conversion cases, place implants as close as possible to the cingulum of the anterior teeth and emerging through occlusal tables of the posterior teeth. Care should be taken to maximize the A-P spread between implants to minimize cantilevers.
7. Bone segmentation is performed with Diagnocat software to turn the patient’s jaws into accurate STL models (Figure 5).
8. Place lateral stabilization pins between implant positions to stabilize the guide (Figure 8).
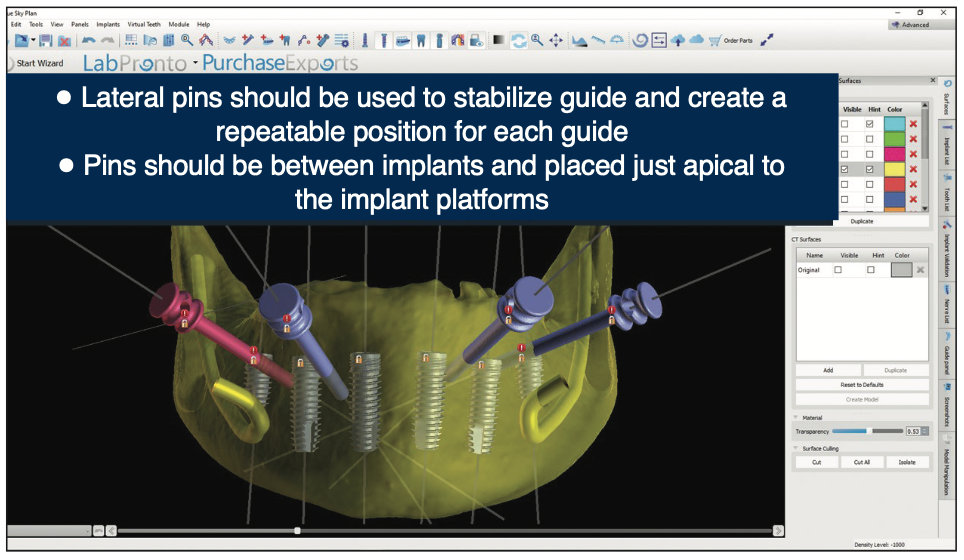
Figure 8. In the implant panel, add a lateral pin to hold down the surgical guide against the bone.
9. Design a guide over the jaw (edentulous) or the teeth and jaw (dentate) using software (Blue Sky Plan). The guide should extend over the posterior ridge. Use the “Cut All” tool to remove all the bone and tooth tissue 1.5 to 2 mm above the implant platforms (Figure 9). This same cut will be applied to the surgical guide, which creates a bone reduction guide. Export the reduction guide from Blue Sky Plan.
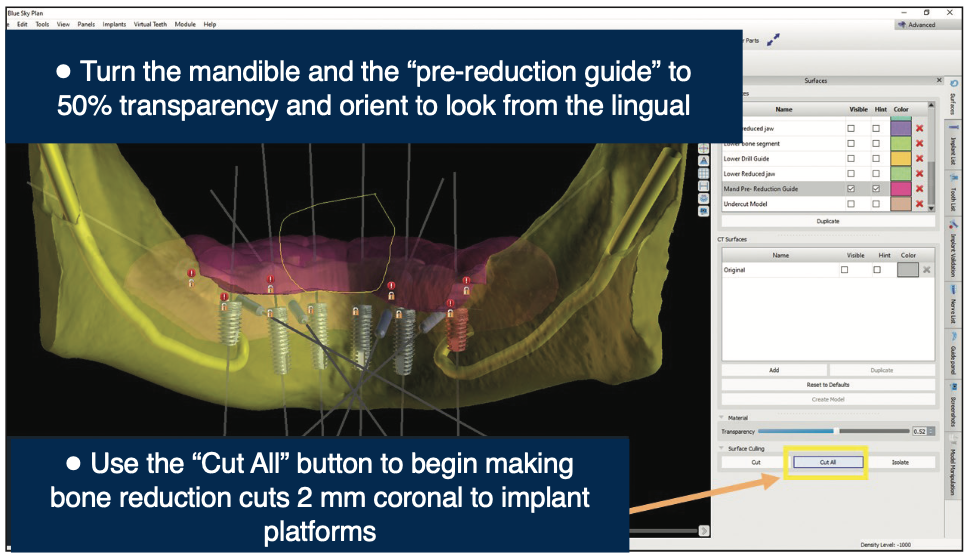
Figure 9. The “Cut All” tool will remove the guide that was made over the ridge along with the segmented mandible (Blue Sky Plan).
10. To make an implant guide, the same reduction guide that was previously designed can be modified to become the implant guide. Export this bone reduction guide and the implant guide tubes simultaneously. Open this file in Meshmixer (a free program) and connect the floating guide tubes to one another and down to the reduction guide using the “Add Tube” feature. This file is now saved and ready for the 3D printer (Pro 95 S [SprintRay]) using Surgical Guide 3 resin (SprintRay) (Figure 10).
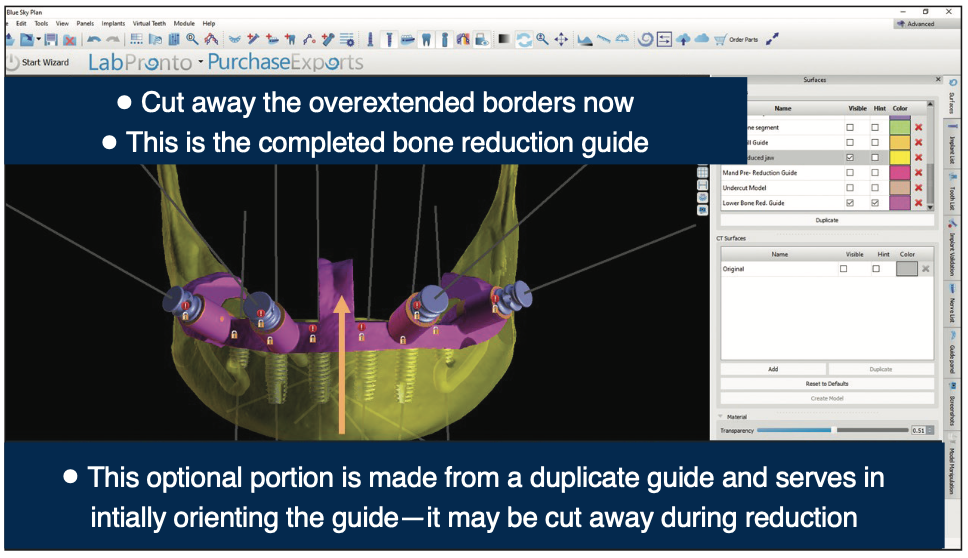
Figure 10. Bone reduction guide finished, ready to export and print. Exporting this along with the guide tubes will give you your surgical guide (Blue Sky Plan).
CONCLUSION
This simplified approach to full-arch implant therapy can help achieve faster surgeries with less stress and more consistent results without the additional expense and turnaround time typically associated with lab-fabricated guides. To be sure, there is planning time required to achieve these advantages. However, it is not “wasted time” and is probably far less than you might expect. In the authors’ experience, the knowledge and confidence gained in planning such cases ourselves, along with the improved outcomes, have far outweighed any perceived downsides. Achieving the skill to consistently get good results on full-arch cases with a freehand approach takes years of training, reading, education, and practice. Guided surgical placement is a proven method to make surgical placement more accurate and consistent, and it can significantly reduce the learning curve. These 10 steps can ultimately become simple enough so that some of these surgical guide design tasks can be delegated to trained staff members and then finalized by the dentist. We hope this step-by-step process helps reduce the complexity of advanced treatment.
REFERENCES
1. Mijiritsky E, Ben Zaken H, Shacham M, et al. Variety of surgical guides and protocols for bone reduction prior to implant placement: a narrative review. Int J Environ Res Public Health. 2021;18(5):2341. doi:10.3390/ijerph18052341
2. Domingue D, Glenn C. Advanced full arch-implant surgery: non-guided vs guided. A retrospective study. Dental Town. 2018.
ABOUT THE AUTHORS
Dr. Domingue graduated from the Louisiana State University School of Dentistry and obtained his DDS degree in 2007. After dental school, he completed a 3-year advanced training at Brookdale University Hospital and Medical Center in New York City, where he served as chief resident of the dental and oral surgery department. Dr. Domingue is a member of the ADA; a former president of the Acadiana District Dental Association, American Academy of General Dentistry; and is the founder and president of the Acadiana Southern Society. Dr. Domingue currently resides in Lafayette, La, where he and his partner, Dr. Jerome Smith, work in an implant referral practice: Acadiana Dentistry. Dr. Domingue can be reached at danny@jeromesmithdds.com.
Dr. Glenn graduated from the University of Tennessee (UT) Health Science Center College of Dentistry. Following graduation, he went on to complete the Lutheran Medical Center’s advanced education in general dentistry residency at the UT Memphis branch. He is a graduate of the Georgia Maxi Course in Implant Dentistry and the American Orthodontic Society’s Comprehensive Ortho Program and is credentialed as an Associate Fellow in the American Academy of Implant Dentistry. He is also one of the founders of the online learning center Blue Sky Bio Academy. For several years, Dr. Glenn ran a private practice in Winchester, Tenn, and is now the VP of Technology for Blue Sky Bio, where he works in product and software development as well as clinical customer support. He speaks extensively on the topics of CAD/CAM, cone-beam technology, guided dental implants, dental photography, digital smile design, complete dentures, and complex full-mouth rehabilitation. He can be reached at ncoryglenndds@gmail.com.
Disclosures: Dr. Domingue reports no disclosures. Dr. Glenn is a consultant and the director of technology for Blue Sky Bio.