José Gabriel Martínez explores a reliable workflow for easy and dependable tooth shade determination and material selection.
Standardising visual tooth shade determination and precise shade reproduction are some of the everyday challenges faced in dental practices today.
The perception of colour is based on subjective, visual sensory impressions. It is influenced by a number of factors. For example, lighting conditions have a significant impact on the shade chosen during tooth shade determination.
The basic shade of the tooth is mainly defined by the dentine. The layers of enamel on top produce a variety of optical effects, depending on the thickness and translucency.
The following clinical case presentation (illustrated in Figures 1-9) demonstrates how, by using the Vita Easyshade V digital spectrophotometer (Vita Zahnfabrik, Germany), easy and reliable tooth shade determination and material selection can be.
Clinical situation
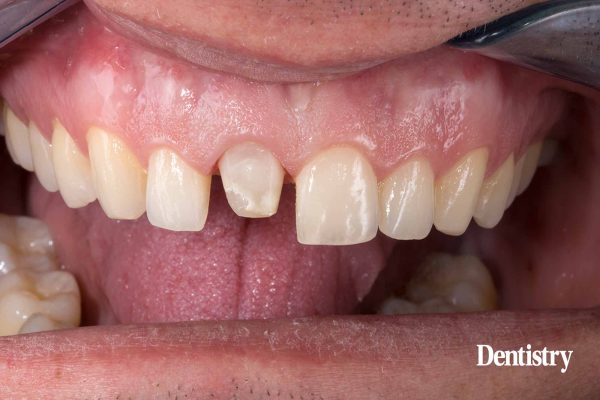
A patient’s upper middle incisor was reconstructed using a direct composite restoration, which fractured.
In addition to the material deficiency, the patient was also not satisfied with the tooth shade and aesthetic appearance.
For that reason, the decision was made to reconstruct the tooth using an efficient, digital workflow with a monolithic, tooth-coloured feldspar ceramic crown.
In order to treat the patient in a single session, a full crown restoration was performed and the composite structure was almost entirely removed.
Following that, a temporary crown was made from the CAD/CAM Vita CAD-Temp Multicolor composite material using the 2M2 shade, in order to stabilise the tooth and soft tissue.
Tooth shade determination
The shade was digitally determined using the Vita Easyshade V, which achieved a perfect colour match between the new restoration and the neighbouring left incisor tooth.
A spectrophotometer was used to transmit defined light into the dentine core and the reflected light spectrum was recorded by a measuring probe.
The spectral data was then analysed independently from the ambient conditions and the tooth shade was determined.
This procedure was used to determine the 2M2 tooth shade for the patient and to select the system-recommended Vitablocs Reallife blank (Vita Zahnfabrik).
In order to provide the dental technician with detailed information on the results, additional digital photos were created in raw format. The photographs were taken using the shade guide and a polarising filter in order to reduce reflections.
CAD/CAM workflow
After an analogue method was used for the impression and model fabrication, the situation was scanned using the Ineos X5. The crown was constructed using the Inlab-CAD software (both Dentsply Sirona).
The applied Vitablocs Reallife replicated the tooth’s natural arched shade gradient between the dentine and anterior, thanks to 3D layered structure.
In order to reproduce the shade and translucency of the neighbouring anterior teeth with a natural appearance, the virtual restoration was positioned individually within this three-dimensional layer structure.
The monolithic restoration was then fabricated using the Inlab MC XL milling unit (Denstply Sirona). Finally, the restoration was finished with fine diamond and polishing tools.
Treatment result
During the clinical try-in, the patient and technician were both highly satisfied with the results. The feldspar ceramic crown was well integrated into the natural tooth structure.
After conditioning the lumen with hydrofluoric acid and silane, the crown was fixed with adhesive.
Precise digital tooth shade determination, the correct blank choice based on the Vita Easyshade V block mode and the additional information provided by digital photography were the success factors in the efficient production of an aesthetic, monolithic restoration with natural shade effects and light dynamics.
This article first appeared in Clinical Dentistry magazine. For more articles like this you can sign up to the magazine here.


