

INTRODUCTION
Complex cases can be challenging for a variety of reasons, such as patient demands, budgetary constraints, clinical conditions, and so on. When facing cases of this type, which many dental practitioners will immediately recognize as typical, a team approach between the dental practitioner and the dental laboratory is best. Along with using basic new technologies at our disposal, the team can aid in eliminating potential challenges to achieving the desired results that satisfy the patient’s expectations and budget while decreasing the practitioner’s stress levels.
In addition to identifying a solid lab partner to handle the case, the dental practitioner can also take advantage of the advancements in cementation, restorative materials, and dental laboratory virtual planning technology to achieve results that satisfy the patient’s expectations while avoiding the stresses that can arise from complex cases.
In this case, a patient presented with a situation not all too unusual in dentistry—a blend of clinical issues, conditions lost to time, and high expectations to have it addressed to her specific needs and budget. In this circumstance, the choice of lab, materials, and cementation enabled a consistent and predictable workflow for the patient that mitigated stress for the practitioner, team, and patient.
SETTING THE COMPLEX CASE UP FOR SUCCESS
Choosing the Laboratory
When choosing the dental laboratory you want to work with, using virtual planning tools is critical to improve communication between the practitioner and lab so that the patient’s expressed aesthetic and functional goals can be achieved with minimal stress. The lab should also be able to furnish a provisional to “test-drive” the aesthetics and function to allow the patient to express any changes he or she may want prior to fabrication of the final prosthetics. With virtual design incorporating those changes, the lab can quickly make the requested changes and allow the practitioner to see a virtual model before the lab fabricates the restorations. Those changes may include midline placement and angulation, vertical dimension of occlusion (VDO) increases or decreases, and/or shade changes. Virtual planning capabilities with the laboratory are essential.
Prosthetic Planning Choices
Zirconia restorations are increasingly being used both with natural teeth and implants as either single units, partial arches, or full-arch prosthetics. Cementation to zirconia has, in the past, been a potential issue to achieve a good bond to the zirconia. Some routinely used cements (such as glass ionomers) have minimal, if any, real bond to the zirconia surface, and debonding becomes a potential issue over time. Resin cements have been recommended to prevent debonding and are commonly used for this application. Therefore, the selection of a resin cement with high bond strength to zirconia is important. Additionally, the use of a resin cement that has high bond strength to metal eliminates potential debonding between the cement and the abutment head.
One challenge when cementing to implant abutments vs natural teeth is a snugger fit of the prosthesis to the abutments when multiple units are being restored (partial- or full-arch restorations) than typically observed with natural tooth preparations. Thus, the utilization of resin cement with a low film thickness allows full seating of the restorations without the cement potentially preventing that seating. The author suggests, especially when cementing a restoration on an implant abutment, to not fill the interior of the abutment with cement as this may prevent full seating of the restoration due to hydraulic pressure as the cement pools at the coronal of the abutment. Placement of cement on the interior marginal area of the abutment crown permits full seating as the cement spreads coronally as the restoration is seated.
BruxZir Dual Cure Resin Cement (Glidewell) fulfills the goals discussed. The resin cement has high bond strengths to dentin and etched enamel without the need for a separate bonding agent. Additionally, its high bond strengths to various restorative materials allow its use with metal-based restorations, metal implant abutments, various ceramics in use for restorations, and zirconia. The cement’s high compressive strength and shear bond strength allow its use for any clinical situation and crowns, bridges, and veneers that require cementation. BruxZir Dual Cure resin cement is well-suited for cementation of zirconia, helping eliminate potential debonding of the restoration from the underlying tooth or implant abutment.
CASE REPORT
An 80-year-old female patient of the practice presented after an absence related to the pandemic and family health issues indicating several teeth had broken. The patient had previously been treated in the author’s practice with implants in the maxillary left posterior and posterior bilaterally in the mandible. The examination noted several remaining teeth had fractured (Nos. 5, 9, 10, 11, and 21), of which several had prior endodontic treatment, and the crowns had been lost. Mobility of Grade 1 was noted on teeth Nos. 22 to 26. The implant crown on No. 14 was missing.
A panoramic radiograph was taken to evaluate the teeth and implant present (Figure 1). Evaluation of the radiograph noted recurrent decay on the crowns of teeth Nos. 7 and 27, which had prior endodontic treatment, and a periapical lesion was noted on No. 27. Those natural teeth were in poor condition and would not be restorable. Bone levels on the existing implants at Nos. 12, 14, 15, 19, 20, and 28 to 30 demonstrated no crestal bone loss.
Figure 1. The patient presented with fractured teeth and periodontal bone loss on the remaining teeth in both arches.
The patient expressed a desire to replace the natural teeth with implants to reduce the risk of additional potential problems vs attempting to restore the remaining natural dentition.
The patient indicated she wished to be sedated during the extractions and implant placement due to her exaggerated gag reflex. With that in mind, she would be referred to an oral surgeon who would perform the extractions and implant placement under the desired sedation. A treatment plan was formulated to place implants at sites 3, 5, 8, 9, and 11 in the maxilla and 21, 24, and 27 in the mandible. Restoration would consist of custom abutments in both arches and restoration with BruxZir monolithic cementable bridges on Nos. 3 to 11 and 21 to 27, with a single crown at No. 14.
Impressions were taken, and provisional partial dentures were provided as the plan was not to immediately load the implants due to her age and concern about bone density. The patient was given a referral to the OMFS, and a consultation appointment with them was scheduled for her.
The provisional partial dentures were returned from the lab. The OMFS office was notified that we had them and to have the patient scheduled with our office to insert them a few days following her implant placement appointment. The patient was treated under sedation, wherein the remaining teeth were extracted. AnyRidge implants (Mega’Gen USA) were placed as follows: No. 3: 5 × 10 mm, No. 5: 4 × 11.5 mm, No. 8: 4.5 × 11.5 mm, No. 9: 4.5 × 11.5 mm, No. 11: 4 × 11.5 mm, No. 21: 3.5 × 11.5 mm, No. 24: 3 × 10 mm, and No. 27: 4 × 11.5 mm. Cover screws were placed with primary closure over the implants being achieved.
The patient presented 4 days following extractions and implant placement with the implants covered with soft tissue. The provisional partials were tried in, adjusted, and relined with COE-COMFORT tissue conditioner (GC). The design of the maxillary partial was with a minimal horseshoe palatal coverage due to her exaggerated gag reflex. The patient was scheduled a week later to check the provisionals. She presented for that appointment indicating she was having issues with gagging and, after a day or 2, decided not to wear the provisionals and consume a very soft diet. During a discussion with the patient, she indicated she would prefer not to wear any provisionals and was functioning well without them. She was scheduled to return in 2 weeks to check soft-tissue healing and see if she was having any issues with eating without the use of the provisionals. At that appointment, she again indicated she was functioning well without the provisionals and was comfortable until her appointment to uncover the implants to initiate the restorative phase of treatment.
The patient was scheduled to see the OMFS at 4 months for implant uncovery, wherein he uncovered the implants under local anesthetic and placed healing abutments. The restoration was missing on implant No. 12. A panoramic radiograph was taken, and it was noted that the screw on No. 12 had fractured in the implant (Figure 2). A modification was made to the treatment plan for the maxillary arch. The crown would be removed on implant No. 15, and No. 12 would be buried with the full-arch restoration, including the current abutments on Nos. 14 and 15, to yield a zirconia bridge from Nos. 3 to 15.
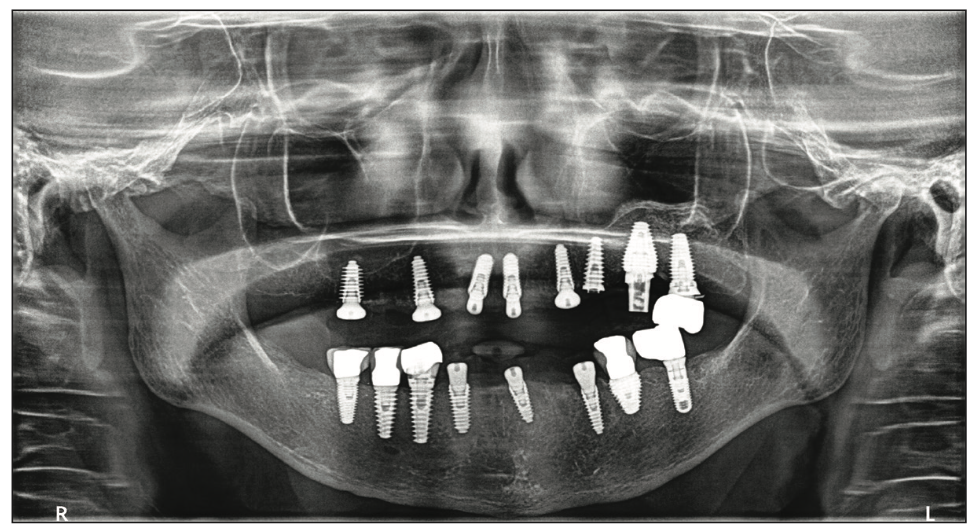
Figure 2. The panoramic radiograph following extraction of the natural teeth and implant placement after a 6-month healing period. The restorative phase of treat- ment was ready to be initiated.
After a soft-tissue healing period of 2 weeks, the patient returned to initiate the restorative phase. The crown was removed from implant No. 15, leaving its abutment on the implant. The healing abutments were removed, and closed-tray impression copings were inserted into each implant. Periapical radiographs were then taken to confirm full mating of the prosthetic part and the implant connectors. An impression was then taken in a full-arch tray of both arches utilizing NoCord light-body VPS (Centrix Dental) injected around the tissue aspect of each coping, and the tray was filled with NoCord MegaBody VPS (Centrix Dental). Upon setting, the trays were removed, impression copings were removed intraorally, and the healing abutments were reinserted. The provisional partial dentures would be utilized to capture the bite and occlusion. They were inserted, Access BLUE Bite VPS (Centrix Dental) was expressed over the occlusal surfaces, and the patient was guided into occlusion. Upon setting, the bite registration and provisional partials were removed as one unit to be sent to the lab.
The impressions, bite registration, and implant analogs with copings were sent to the lab (Glidewell) to start the prosthetic fabrication. A lab prescription was sent requesting custom abutments for implant Nos. 3, 5, 8, 9, 11, 21, 24, and 27. Additionally, provisional fixed restorations were requested to fit the custom abutments for Nos. 3 to 15 and 21 to 27. Soft-tissue models for both arches were fabricated at the lab utilizing the closed-tray impressions sent (Figure 3). These were then mounted on an articulator using the bite registration and provisional partial dentures (Figure 4).
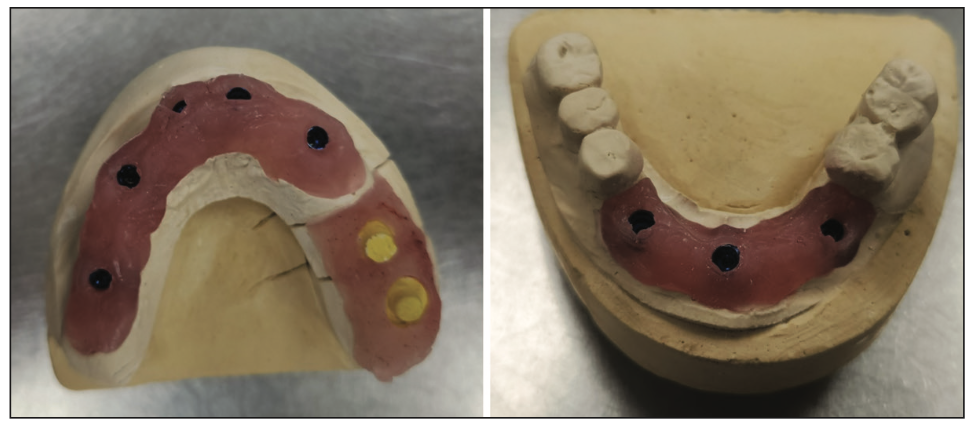
Figure 3. Soft-tissue models were created at the lab utilizing the open-tray impressions that had been sent.
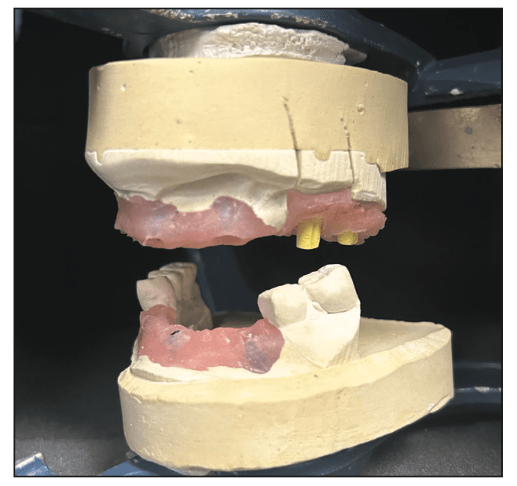
Figure 4. The soft-tissue models were then mounted on an articulator using the bite registration and provisional partials.
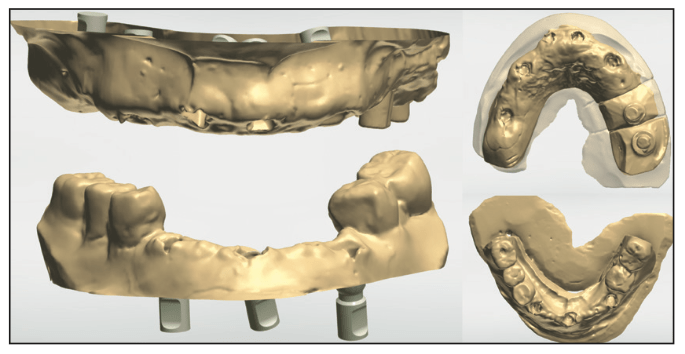
Figure 5. Virtual models were imported into exocad (exocad) to start virtual design of the custom abutments and provisional bridges.
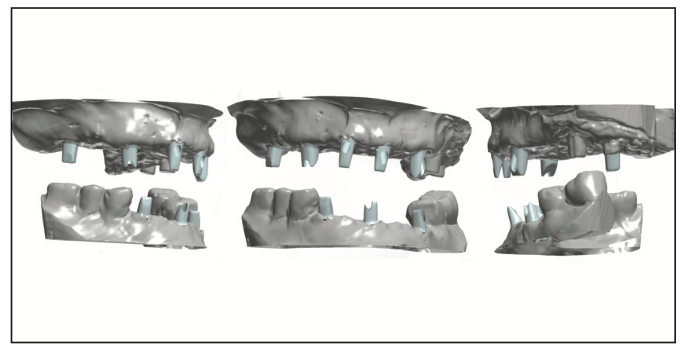
Figure 6. Virtual design of the abutments for cementable restorations for both arches.
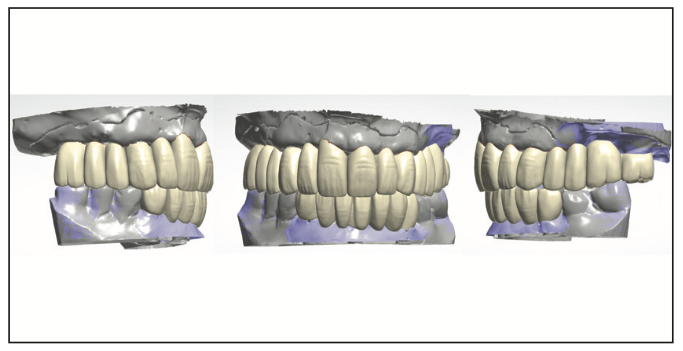
Figure 7. Virtual design of provisional restorations to verify aesthetics intraorally.
Glidewell’s laboratory technicians scanned the soft-tissue models, created virtual models, and imported them into the lab’s system (Figure 5). Custom abutments were designed for the implants to be parallel with each other and the abutments on the old implants at Nos. 14 and 15 (Figure 6). Those were then individually milled from titanium on the Haas 5-Axis milling unit. They were then polished and finished. Next, virtual provisional bridges were designed to fit the virtual abutments previously designed in the lab’s system (Figure 7). Two sets of provisional bridges were milled in shade B2 using polymethyl methacrylate resin (BioTemps) on a Glidewell mill. One set would be used to capture a new bite registration intraorally and note any aesthetic changes desired, while the other set would be used as provisional restorations, allowing the patient to “test-drive” the aesthetics and occlusion. The custom abutments and resin placement jigs with the provisional bridges were returned to the office.
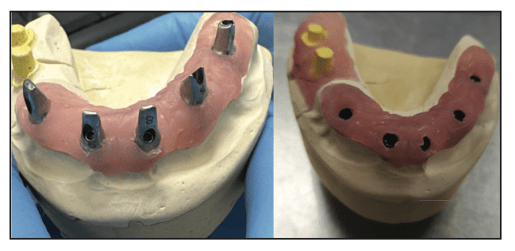
Figure 8. Maxillary abutments on the soft-tissue model (left) and with an abutment placement jig seated over the abutments on the model (right).
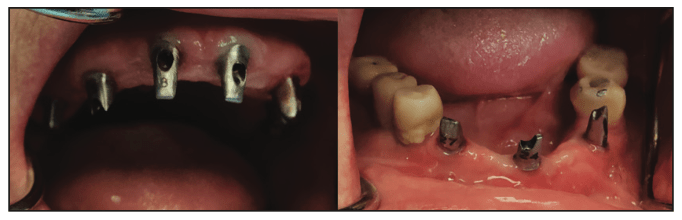
Figure 9. Custom abutments were tried in, and seating was then verified radiographically.
The patient returned, and the healing abutments were removed intraorally from the anterior mandibular implants. The placement jig for the maxillary arch was placed on the abutments on the soft-tissue model, and the screws were removed from the abutments (Figure 8). The jig was transferred to the mouth and seated on the mandibular implants. The screws were inserted and finger-tightened. Periapical radiographs were taken to verify full seating of the custom abutments at the implant connectors. Upon verification, the screws were tightened to the implant manufacturer’s specifications with a torque wrench. This was then repeated on the mandibular arch (Figure 9). The provisional bridges were tried in over the custom abutments intraorally to verify full seating. The patient was shown a mirror, and she indicated she was happy with the shade. It was noted that the maxillary midline was tipped to the right, and that would be corrected in the final restorations. Photos were taken to communicate with the lab technicians (Figure 10). Teflon tape (PTFE) was placed into the screw access holes on the abutments to prevent cement contact with the screw heads. The provisionals were then cemented with NexTemp Temporary Cement (Premier Dental), and the patient was dismissed to “test-drive” the aesthetics for a few days. Four days later, the patient was called and asked if she was happy with the aesthetics and if she desired any changes. She expressed satisfaction with the shade and general aesthetics. We suggested decreasing the VDO so that less maxillary teeth showed when smiling, and she accepted that recommendation and the one to adjust the maxillary midline.
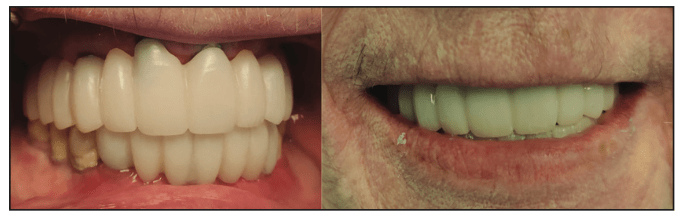
Figure 10. Provisional restorations were tried in to allow the patient to aesthetically “test-drive” the restorations before any potential changes would be communicated to the lab.
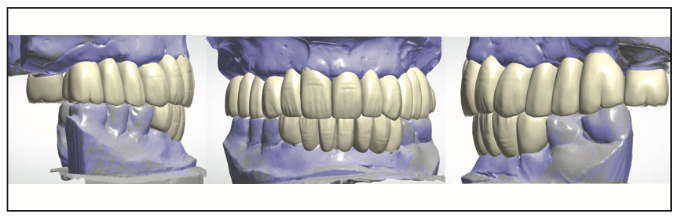
Figure 11. Modifications were made in the virtual design to decrease the VDO, at the expense of the maxillary arch, and change the angle of the midline to a more vertical axis.
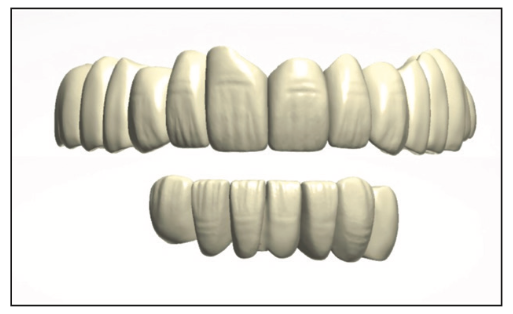
Figure 12. Virtual design of the maxillary and mandibular BruxZir monolithic bridges (Glidewell).
Upon receipt of the clinical photos, the second set of provisionals with midline angle correction was marked with a Sharpie marker, and we requested the lab tech also decrease the VDO at the expense of the maxillary arch and design the final prosthetics (Figures 11 and 12). The final bridges were milled from BruxZir Monolithic Zirconia (Glidewell) on a 5-Axis milling unit (Haas). Following milling, support legs were removed, and those areas were ground and polished, and then the bridges were fired to complete them (Figure 13). Stain was then applied to match the gradations on the VITA shade tab for B2 to achieve a natural appearance and eliminate a monochromatic aesthetic (Figure 14). The stained BruxZir bridges were fired, then glazed (Figure 15) and re-fired to finalize the monolithic bridges (Figure 16).
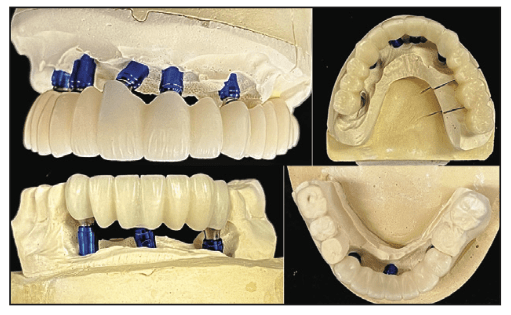
Figure 13. Maxillary final BruxZir full-arch and mandibular anterior BruxZir-cemented restorations following milling and processing.
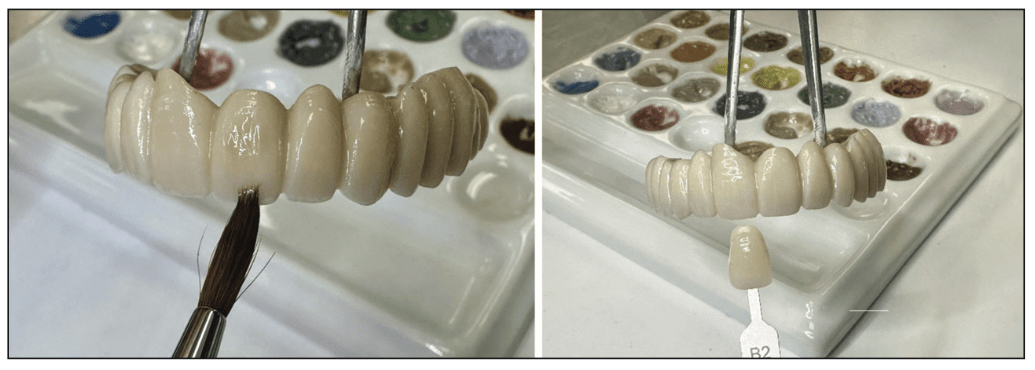
Figure 14. The lab applied stain to the fired BruxZir restoration for characterization and verified it with the selected shade tab.
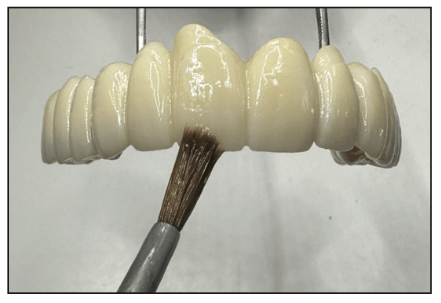
Figure 15. The lab applied glaze to the BruxZir restoration following baking the stain to finish the cementable implant bridge.
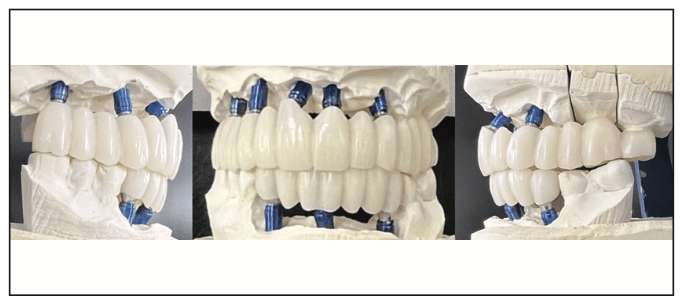
Figure 16. The final glazed and stained BruxZir restorations.
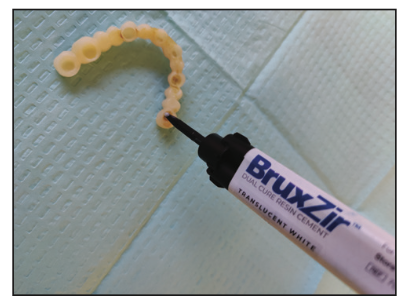
Figure 17. Placement of BruxZir Dual Cure Resin Cement (Glidewell) into the abutment crowns on the BruxZir bridge in preparation for cementation.
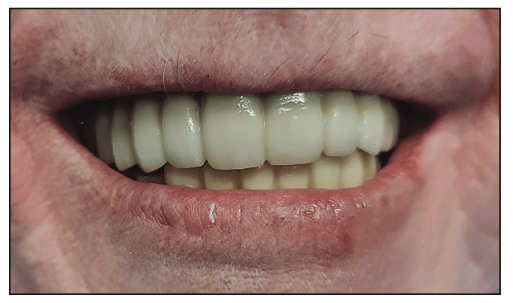
Figure 18. Final BruxZir maxillary full-arch and mandibular anterior bridge following luting with BruxZir Dual Cure Resin Cement and demonstrating final aesthetics.
The patient returned to the office, and the provisional bridges were removed intraorally. Any residual temporary cement was cleaned from the abutments intraorally. The BruxZir monolithic bridges were tried in to confirm passive seating over the implants on each arch. The occlusion was verified, and no adjustments were made. The patient indicated the bite felt even and comfortable. The interiors of the abutment crowns on each bridge were dried with a cotton pellet. BruxZir Dual Cure Resin Cement was placed into abutment crowns on each bridge at the interior marginal area, not filling the area so that, upon placement, the cement would not prevent full seating (Figure 17). The implant abutments were dried with gauze, and the bridge was seated fully on the maxillary arch. This was repeated with the mandibular bridge, and the patient was guided to bite into cotton rolls placed bilaterally in the posterior as well as one in the anterior. Following the setting of the resin cement, the cotton rolls were removed, and excess cement was marginally removed with a scaler. The patient was asked to occlude and indicated the bite felt even and comfortable. She was shown a mirror and indicated she was happy with the aesthetics, noting that it looked natural to her (Figure 18). The patient was scheduled for a post-insertion appointment at one week to check and confirm the occlusion after she had time to function with it.
CONCLUSION
Complex treatments, especially when a full arch is being treated, can provide challenges to achieve the patient’s desired aesthetic goals. The team approach aids in achieving the planned goals while decreasing stress on the practitioner, resulting in a satisfied patient at the completion of treatment. As outlined in the case presented, planning needs to follow each patient’s expressed treatment requests with regard to aesthetics and function. Additionally, in complex cases, when placing implants on an arch where previously placed and restored implants are present on natural teeth that were not being treated, changes may result during the treatment process that require modifications in the treatment plan. Coordination with the lab team aids in incorporating necessary changes as they may arise.
Cementation of zirconia restorations has posed a challenge in the past, with the potential of debonding from the zirconia being a common occurrence. BruxZir Dual Cure Resin Cement has high bond strengths to dentin, etched enamel, metal (metal-based restorations or implant abutments), ceramics, and zirconia, allowing its use in any clinical application that requires cementation.
ACKNOWLEDGMENTS
The author would like to thank Dr. Anis Tebyanian, for the oral surgery aspects of the case presented, and the following Glidewell technical experts who assisted through the planning and execution of the discussed case: Catalina Bollman, senior manager, dental production; Luis Rodriguez, CAD/CAM scanner; Jorge Espinoza, CAD/CAM designer; Isaiah Porter, quality control, final; Steve Tran, cement technician III; Nhi Tran, dental technician; Danny Nguyen, CAD/CAM design technician; Mike Lee, manager, dental production; Haiping Li, glaze team leader; Celine Jun, stainer; and Erik Baltazar, manager, dental production. Thank you!
ABOUT THE AUTHOR
Dr. Kurtzman is in private general practice in Silver Spring, Md. A former assistant clinical professor at the University of Maryland, he has earned Fellowships in the AGD, the American Academy of Implant Prosthodontics, the American College of Dentists, the International Congress of Oral Implantologists (ICOI), the Pierre Fauchard Academy, and the Association of Dental Implantology; Masterships in the AGD and ICOI; and Diplomate status in the ICOI and the American Dental Implant Association. He has lectured internationally, and his articles have been published worldwide. He has been listed as one of Dentistry Today’s Leaders in Continuing Education since 2006. He can be reached via email at dr_kurtzman@maryland-implants.com.
Disclosure: Dr. Kurtzman reports no disclosures.