

Often in dentistry, patients present with concerns that they want solved but are not necessarily easy to address. Esthetic concerns are the most difficult ones for us clinicians to understand as a patient’s idea of esthetic is very subjective and sometimes difficult for them to express. However, these ideas can be revealed through careful questioning and discussion.
I recently had a healthy non-smoking 35-year-old male patient present to the office with a chief complaint regarding previous composite restorations completed three years prior. To the patient, the restorations never quite “looked right.” He additionally stated that there was a lot of bleeding when he flossed. Looking at Figure 1 and 2, you can understand the main concern of the patient.
Figure 1: Initial presentation of the 35-year-old male patient. Previous composite restorations used to close diastema spaces between #7 & 8 and #8 & 9.

Figure 2: Anterior retraction photo further showing initial presentation.
To understand the patient’s expectations in addressing his chief complaint, myself and the patient had an in-depth conversation regarding color, shape, and the ultimate end goal. I came to find out that the patient had previously undergone a diastema closure with resin composite restorations between teeth #’s 7 & 8 and 8 & 9 post clear aligner orthodontic therapy.
Unhappy with the outcome, the patient was looking for an improvement with a more esthetic solution. The treatment options discussed with the patient were: no treatment, composite replacement or ceramic with layered porcelain veneers. Each of these treatment options included a discussion regarding a maxillary frenectomy to relieve the high fibrous tissue attachment. Ultimately, the patient’s decision was to proceed with a staged approach of composite restorations, maxillary frenectomy followed by veneers few months later.
Envisioning the idealized size, shape, color, and contours of the patients’ four maxillary incisors were key in achieving an acceptable clinical and esthetic outcome (Figures 3-7). Additionally, the material selection was of paramount importance to make this possible.

Figure 3: Note the poorly contoured restorations of #8 & 9. Bacterial entrapment occurring subgingivally with associated inflammation.

Figure 4: Mesial-Facial-Incisal of #7 has a well-contoured composite restoration closing a small diastema.

Figure 5: The patient likes the size and shape of #7 and requests #10 to look similar.

Figure 6: Distal-Incisal line angle of #9 is more rounded compared to #8. This gives the illusion of a narrower tooth. The Mesial-Insical line angel of #10 is insufficient when compared to #7.

Figure 7: Proposed addition to #9 & 10.

Figure 8: Shade selection is between a Vita Shade A1 and A2.
Blending hues, values and opacities using traditional resin composites is a difficult task for almost every clinician. As we know, traditional composite resins that rely on dyes and pigments increase complexity and overhead in performing these procedures. However, now, there is an easier answer with a product released in 2019 by Tokuyama Dental.
Tokuyama’s OMNICHROMA entered the dental market with much fanfare and applause. A truly remarkable restorative material, OMNICHROMA is highly esthetic, highly versatile, and easily manipulated. It is indicated for any and all restorative Classes (I-V).
Recognizing its need in the restorative arena, Tokuyama has also introduced OMNICHROMA BLOCKER, OMNICHROMA Flow, and OMNICHROMA BLOCKER Flow. These four products within the OMNICHROMA product family allow clinicians to achieve esthetic and biomimetic restorations in the majority of clinical cases that present to their practice.

Figure 9: Previous composite restorations removed using red and green stripe diamond burs. The preparation left in enamel and tapered into the tooth along the gingiva. Note the agitated tissue Mesial to #8 from the poorly contoured previous composite.

Figure 10: Striations are made into the enamel where the composite will be placed to better utilize OMNICHROMA’s unique properties.

Figure 11: Horizontal striations.

Figure 12: Vertical striations.

Figure 13: Recreation of a proper contour using a sectional matrix. It’s important to pre-curve when necessary and trim the gingival portion of the matrix to allow it to slip into the sulcus.
OMNICHROMA BLOCKER is a universal opaquer best used when trying to replicate shades between Vita A1 and A3. A darker opaquer is recommended when replicating shades outside of that range. The placement of the BLOCKER is key and a minimum of 0.5mm should be placed only in those areas of the tooth where translucency is not desired. Note in Figure 14 that the BLOCKER is tapered off approximately 1mm away from the incisal edge and includes only a thin shell.

Figure 14: Teflon tape is placed on the adjacent tooth to prevent adherence of bonding or composite to #9. The most critical component of a diastema closure with OMNICHROMA is seen here. Utilizing OMNICHROMA BLOCKER Flow and OMNCHROMA BLOCKER, a properly sealed and contoured base layer is placed.
In this case, OMNICHROMA BLOCKER Flow was placed along the gingival margin and then OMNICHROMA BLOCKER was placed to finish the base layer. OMNICHROMA Flow and OMNICHROMA were placed in small increments to achieve the result seen in Figure 15.

Figure 15: OMNICHROMA Flow is placed in a thin layer along the gingival margin and striations on the preparation. OMNICHROMA packable composite is then placed over top of the flowable in small increments.
To ensure proper papillary rebound post diastema closure of the #8 and #9, it was decided that the patient was to return in one week for a follow-up visit. At this visit, the patient was re-interviewed to confirm their end goal and to check satisfaction with the new restorations. Ecstatic with the results, the patient agreed to continue with recontouring between #9 and #10.

Figure 16: The restoration is contoured and finished prior to placing the composite on #9.

Figure 17: Note the proper contour along the gingiva.
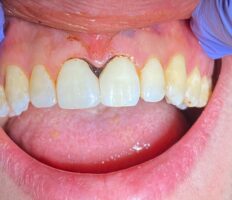
Figure 18: The restoration on #9 is placed and properly contoured following the same procedural steps as #8.
All contouring and polishing was completed using traditional dental burs, Shofu’s Super-Snap Rainbow Technique Kit, Shofu’s Super-Snap SuperBuff Disks and Shofu’s DirectDia Polishing Paste. The key for this case and with any direct composite restorations is to take the time to finish the case properly. The more time spent polishing the more OMNICHROMA will truly “disappear” into the tooth (Figures 19 and 24).

Figure 19: One-week post-op on the diastema closure of #8 & 9. Note the papillary rebound into the embrasure space.

Figure 20: Initial presentation of #9 & 10.

Figure 21: Minimal enamel beveling, and striations placed into #9 & 10.
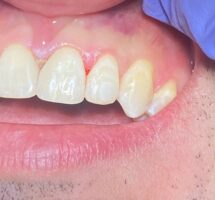
Figure 22: OMNICHROMA Flow placed in a thin layer over striations. OMNICHROMA used to then shape the Distal-Incisal and Mesial-Incisal angles of #9 & 10, respectively

Figure 23: Prior to final polishing.

Figure 24: Final presentation of case. Note the proper width/length of the centrals and laterals to address the patient’s chief complain. The patient will return for a maxillary frenectomy in the next stage of their treatment plan.
Tokuyama’s OMNICHROMA products have unique physical and chemical properties which allow them to be a truly “universal” solution in almost every clinical situation. OMNICHROMA and BLOCKER, both packable and flowable, allow for a simpler, less technique sensitive approach to the placement of anterior and posterior composites. They allow us clinicians to be confident in our material choice and know that we will be able to achieve high-quality esthetic results consistently in our clinical practice.
I use OMNICHROMA, OMNICHROMA Flow and OMNICHROMA BLOCKER (packable & flowable) for almost all my restorations in the esthetic zone. Additionally, OMNICHROMA products are supremely well-suited for use as a Class V restorative material. By removing the stress in shade management both from an esthetic and an office overhead perspective, I have found that choosing OMNICHROMA as a go-to universal composite becomes an easy decision.


Neville T. Hatfield, DMD MBS, graduated magna cum laude from the Boston University School of Dental Medicine. He completed a general practice residency at the Manhattan Veteran Affairs Hospital, where he provided interspecialty comprehensive prosthetic and surgical treatment to medically complex patients. He leverages that experience in private practice in northern New Jersey and maintains clinical privileges at Holy Name Medical Center in Teaneck, New Jersey.