

Dr. Lloyd Taylor presents a detailed technique using Tie-On Rotation Wedges on a finishing archwire to perfectly align contacts
Ideal occlusion is the ultimate goal of ortho-dontic treatment. Patients expect perfectly aligned teeth and are aware of the slightest irregularities. Tie-On Rotation Wedges (TORW) are an easy, efficient, and painless way to correct rotations and achieve ideal proximal contacts in one or two office visits. This article presents the clinical steps for bending offsets in stainless-steel finishing archwires and the placement and application of TORW.
Rotation wedges were invented by Dr. Cecil Steiner, an orthodontist famous for his Steiner cephalometric analysis. His rigid stainless-steel wedges were available in either a small or large size on a .010″ stainless-steel wire. However, now with the TORW, both sizes of his rigid Steiner stainless-steel wedges are replaced with one flexible urethane wedge, which is easily pulled between the tooth and archwire. To produce the desired tooth rotation and perfect alignment of proximal contacts, an offset will need to be created in the finishing archwire. This offset, which is the exact height of the step between the tooth contacts, is driven into the bracket slot while the two wire legs of the TORW are cinched down to produce the perfect tooth alignment.
Fiigure 1: Tie-On Rotation Wedge
Tied-On Rotation Wedge is composed of two parts:
- Urethane wedge — body, seating groove, and two ridges
- The two legs are formed from a 14″ length of .010″ stainless-steel wire bent to form the two 7″ lengths.
Only four instruments are used in the placement of either clear or gray TORW:
- Double Ended Ligature Director Large Tips (Cat. No. 878-205). The “V” straight end is larger than previous ligature directors for easy and secure placement while driving the finishing wire offset down into the bracket slot. This instrument is also ideal for the 90° bend and tucking in of the wire pigtail under the archwire at the end of placement.
- Tweed Arch Plier (Cat. No. 871-131). For bending precise width and angle offsets in round or rectangular stainless-steel finishing archwires.
- Wide 4 mm Mathieu Wire Twisting Hemostat (Cat. No. 878-540). The jaws of this hemostat have been specially designed to securely hold the twisted .010” legs of the TORW as the wire legs are cinched down. Narrower Mathieu plier tips such as Smaha Mathieu, used for placing elastic O-rings, are too fine for twisting steel wires.
- Pin and Ligature Cutter (Cat. No. 871-173). For the precise cutoff of the twisted wire pigtail.
- Gray Wedges (Cat. No. 618-982) for stainless-steel brackets and Clear Wedges (Cat. No. 618-992) for clear brackets, each in packs of 10 TORW.

Figure 2: Instruments for TORW
There are 4 basic steps in the placement of TORW:
- Marking and measuring (Figure 3A)
- Wire bending and insertion (Figures 3B and 3C)
- Wedge placement and cinching (Figures 3D-3L).
- Wedge finishing (Figures 3J-3O).
Tie-On Rotation Wedges are a specialized and unique tool for achieving the perfect tooth rotations sought by orthodontists and expected by patients. Part 2 in the future will explore the fine points and advanced techniques with TORW.
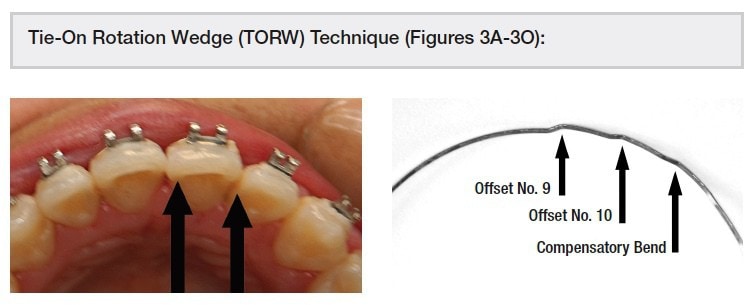
Figures 3A and 3B: A. Using a mouth mirror from an occlusal view, determine the exact distance in millimeters that the tooth to be rotated must be moved to perfectly align the contacts. Here the maxillary left central (tooth No. 9) requires a 1 mm step, and the maxillary left lateral (tooth No. 10) needs a 0.5 mm step. With an ultra-fine ink marker, precisely mark the mesial and distal contacts on the labial surface of the finishing archwire. The marker tips can be cleaned with an antiseptic wipe. B. With a Tweed Arch Plier, make a 1 mm offset bend on the mesial of tooth No. 9 and an 0.5 mm offset bend on the mesial of tooth No. 10. Note that a compensatory bend has been made on the distal of tooth No. 10. This compensatory bend, although quite small, is critical to maintain the symmetry of the finishing archwire

Figures 3C-3E: C. The finishing archwire with its two offsets is inserted in the first molar buccal tubes and then visually checked to assure that the offsets are in the correct position and bent to exact heights. It is critical for perfect tooth rotation that the offset bends on the mesials of tooth No. 9 and tooth No. 10 are precisely located interproximally and are the exactly the height of the needed correction. D. The gingival leg of the Tie-On Rotation Wedge (TORW) is placed first under the archwire. Putting a gentle curve in the end of the gingival leg allows the leg, after passing under the archwire, to turn back labially and thereby avoid sharply contacting the gingiva. E. The wire legs of the TORW are both pulled toward the side of the bracket with the offset. The two ridges on either side of the urethane wedge form a channel where the archwire now sits. As both wire legs are pulled toward the offset, the urethane wedge will be seated tightly against the bracket

Figures 3F-3H: F. The gingival and incisal legs of the TORW are seated under their respective bracket wings. The wire legs are crossed by hand, and a single twist is made in a clockwise direction. To be consistent, wires should always be tightened clockwise so that removal can easily be done in a counter-clockwise direction. G. The initial hand-twisted wire legs are clamped between the wide jaws of the Mathieu. The Mathieu is then used to gently twist the wire legs clockwise until the twist reaches the bracket. H. Gently unclamp the Mathieu, and then re-clamp the jaws around the second twist. Move the Mathieu and twisted wire toward the urethane wedge side of the bracket, opening access for the Double Ligature Director to seat the offset into the bracket slot

Figures 3I-3K: I. The straight end of the Double Ligature Director is used to drive and then hold the wire offset into the bracket slot. Then the Mathieu is rotated 180° clockwise to cinch down the wire offset in the bracket slot. You will see the tooth actually rotate! The patient will feel the pressure of the tooth rotating but no discomfort. J. The Mathieu is gently unclamped and the Ligature Director slowly and carefully released from the archwire, avoiding any sudden movement which might debond the bracket. K. The excess wire beyond the sixth twist is cut off by the Pin and Ligature Cutter leaving a wire pigtail to be placed interproximally under the finishing archwire

Figures 3L-3N: L. Using the straight end of the Double Ended Ligature Director, a 90° bend is made in the middle of the pigtail. M. The 90° bent wire pigtail is then tucked interproximally against the tooth under the archwire. The wedge on tooth No. 9 is placed in the same manner as in Figures 3A-3M as was done with tooth No. 10. N. Labial view showing completed place-ment of TORW on teeth Nos. 9 and 10
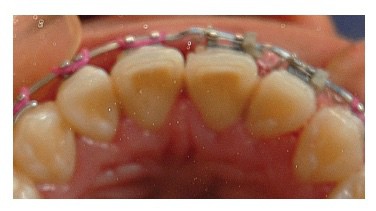
Figure 3O: This occlusal view shows the perfect alignment of both teeth No. 9 and No. 10 immediately after placement of both Tie-On Rotation Wedges. If any minute additional correction is needed, that can be done at the next visit