

Implantology is a highly predictable procedure with a mean survival rate of 94.6% and a mean success rate of 89.7% after more than 10 years.1 Other studies have shown higher success rates with 10-year survival at the implant level (96.4%).2
Of course, that success level only occurs when everything is done right or just about right. As more and more dentists are incorporating this type of treatment into their own practices and a higher number of people are being treated yearly, sound principles are imperative when it comes to treatment planning. About 33%, or one-third, of all dental implants placed are placed by a general dentist with a good success rate.3
The intention of this article is to create a framework that any practitioner can use to develop either a new implant practice or enhance his or her existing one. True, much of what you will read will appear to be simple or common sense. But it is easy to forget the basics or get lazy. Unfortunately, implantology sometimes can be unforgiving!
The key is to have repeatable processes and to keep things simple and straightforward. When it comes to providing care for your patients, it is easy to be caught up in the latest and greatest that dentistry has to offer and lose sight of what is clinically significant.
The first aspects I want to talk about are the patient evaluation procedures such as the health history review, the intraoral and dental history exams, and the radiographic examination.
HEALTH HISTORY REVIEW
One key to success is realizing that a whole patient is connected to the specific dental problem you are trying to treat. This viewpoint is imperative, especially when talking about an invasive surgical procedure such as placing a dental implant. In fact, in this author’s opinion, the health history review is one of the most important predictors of implant success.
This medical evaluation starts with a well-written and comprehensive health history form that asks the “right” questions. It should be easy to read and understand for those filling it out. It should cover past medical history, current medical issues, patient medications, and known allergies. Make sure the document has room for the patient to add anything not specifically covered in the form that may be pertinent to his or her history.
One of the best changes that our offices made in response to the COVID-19 pandemic was to move all our patient forms into a digital format. The patients get a link to fill out all their office forms either by computer or smartphone in advance of their appointments. This allows me to review new patient or updated health histories either the day before or first thing in the morning. It also enables a relaxed and thorough review with plenty of time to make notes for the patient.
When you sit down to review it, there will undoubtedly be medical issues or medications that may be unfamiliar. That’s okay—medicine has become so specialized that most physicians are not currently aware of all the intricacies of other specialties. Treatments and medications are constantly changing, and, unless you are treating those specific patients daily, it is easy to get left behind. So how are you going to catch up? Just do what your patients do when they try to figure out dentistry: go online. In a very short time, you can easily get a handle on whatever it is that you are looking for.
A couple of “red flags” to be aware of:
l Systemic disease processes
l Advanced osteoporosis
One common ailment that is extremely common in our population is diabetes. Patients with diabetes have an increased frequency of periodontitis and tooth loss,4 delayed wound healing,5 and an impaired response to infection. This can result in short- and long-term consequences, such as implant loss and peri-implantitis. In planning for surgery, we would like an A1C less than 8.0. In those patients who do not have this disease under control, avoid immediate loading, allow longer healing, and then add antibiotic coverage and chlorhexidine gluconate at the time of placement.
Autoimmune disorders are rapidly being identified as the root of many diseases. Researchers found a rise over 2 decades in the number of people who had positive antinuclear antibody (ANA) blood tests, a signal of autoimmunity.6 Biologic, immunosuppressive medications are used to treat conditions such as rheumatoid arthritis, Crohn’s disease, and psoriasis, to name a few.
In short, the big things to look out for are diseases or medications that will directly affect the healing process. These can run the gambit from diabetes to autoimmune disorders and from treatment for chronic inflammation with steroids to chemotherapeutic agents and radiation.
Osteoporotic patients have a dental implant failure rate of 10.9%.7 What is more of an issue with these patients is their medications and their effects on healing. These patients are either being treated with conventional bisphosphonates or RANK Ligand inhibitors (Figure 1). In 2011, the International Association for Dental Research officially stated that the incidence of bisphosphonate-related osteonecrosis of the jaw from oral bisphosphonates had only a 0.04% occurrence rate. The major precautions were focused on the IV forms of the drug. When newer medications and therapy regimens came into use, changes were made. In 2014, the American Association of Oral and Maxillofacial Surgeons updated its position paper on medication-related osteonecrosis of the jaw. The paper looked at the effects of various medications used for osteoporosis and in conjunction with cancer therapies. Recently, an excellent overview was published by Resnik8 that summarizes and simplifies the steps we need to take and the considerations to ponder when treating this segment of the population.
Figure 1. A list of the most common drugs used for osteoporosis.
Many other medications can be responsible for the non-integration of implants and have been laid out by Ouanounou et al.9 You should be aware of these medications and substances and consider them when having treatment discussions and planning your implants. They include the following:
- Cyclosporine
- Glucocorticoids
- Alcohol
- SSRIs
- NSAIDs
- Proton pump inhibitors
- Methotrexate
Placing a dental implant requires the creation of a soft-tissue access and an intraosseous preparation, both of which create bleeding points. Any medications that will increase bleeding times by preventing or slowing down the clotting process should be identified. Patients on anticoagulation drugs, such as heparin, coumadin, and Eliquis, along with antiplatelet medications like aspirin, Plavix, and Brilinta, should be closely evaluated, and clinicians should possibly consult with their physicians before commencing treatment.
It is also important today to ask about any herbal supplements that the patient may be taking. Herbal supplements marketed in the United States don’t necessarily offer any proven assurances for safety and efficacy.10
It is not unusual for your patients to be taking these for any number of reasons, and these herbal supplements can have concomitant effects on other medications. For example, ginseng, Ginkgo Biloba, ginger, and vitamin E can all increase bleeding times on their own, but when taken with conventional anticoagulation medications, their effects can be enhanced to potentially dangerous levels.
INTRAORAL EXAMINATION
The intraoral exam has 2 main goals: to determine the feasibility of implant placement with respect to the specific intended site and to evaluate the overall environment in which the implant will be placed.
What kind of partially, fully edentulous, or immediate implant situation are we faced with? What are the conditions of the adjacent teeth? If they are mobile, in poor condition with compromised longevity, or have periapical or periodontal pathology, these issues must be immediately addressed prior to implant treatment. Otherwise, the short- and long-term success of your newly placed implant can be compromised.
Comprehensively evaluating the complete oral environment is a necessity. Resist the natural tendency to become laser-focused on just the implant site. If there is generalized periodontal disease, treat that first. Remember, the same bacteria responsible for periodontal disease can and will find a home on your newly placed implant. Work on arresting decay as soon as possible and make sure to establish a stable occlusal scheme. Stability and load distribution are borne from the combination of natural tooth restorations and implants—or, in the case of full-arch reconstruction, the implants themselves—and necessary for long-term function. The larger the case, the more important this all becomes, but you must do this to ensure success with even a single implant.
Look at the space you have between teeth in an edentulous area, along with the interarch space you will have to restore the implant. The interarch distance becomes very important with regard to the type of restoration you are planning. Each specific type of restoration has vertical requirements for the restorative materials used. For example, a cement-retained restoration on an abutment will need more vertical space than a screw-retained crown. A full-arch zirconia restoration needs 8 to 10 mm of interarch space compared to a conventional metal/acrylic hybrid that requires approximately 17 mm.
Another aspect to evaluate is the thickness and position of the keratinized tissue. Is there enough tissue in the correct position to allow for a 360° encircling of the abutment at restoration (Figure 2)? Will tissue need to be moved to a different position? This can determine whether a flapless approach is possible or not—more on this later in the article. There should be at minimum of 2 mm of keratinized tissue around the abutment for optimal restorative health once the restoration is placed. Tissue thickness also plays a role in implant placement position in the vertical dimension. A thin gingival biotype may require a deeper, subcrestal placement or a connective tissue graft to allow the room necessary to have a proper emergence profile. Just remember that implant placement is a restoratively driven surgical procedure!
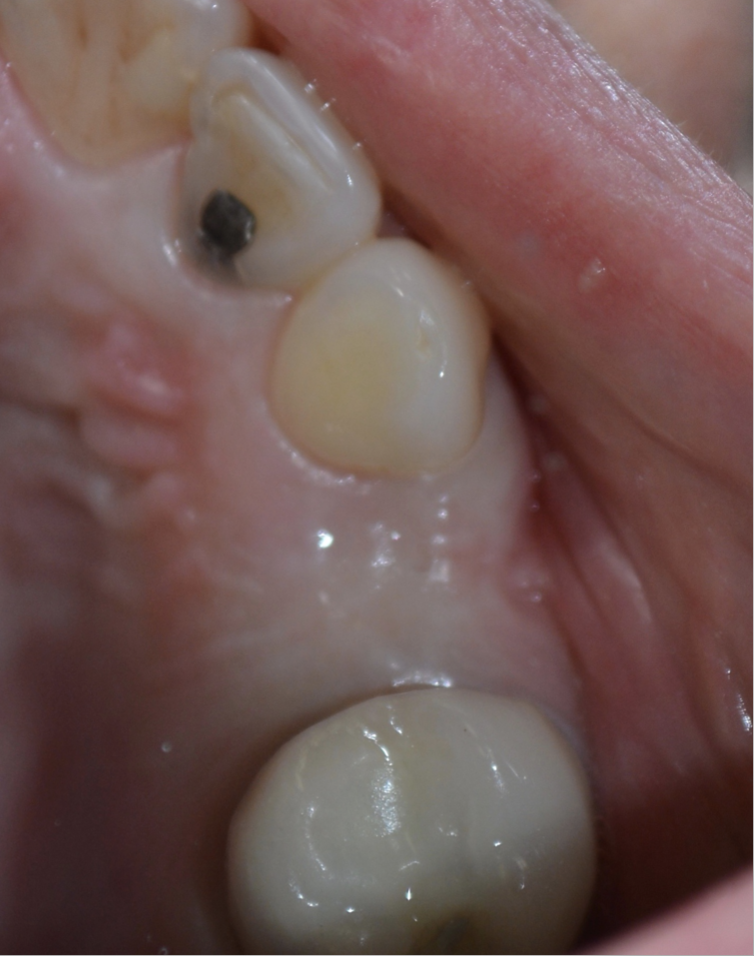
Figure 2. An excellent width of keratinized mucosa.
Past dental history is another crucial area to delve into during the treatment planning appointment. It is beneficial to know how the tooth or teeth were lost and whether the site was grafted at the time of extraction or whether there was possibly a defect that was not repaired. These situations can have an impact on what kind of bone volume is available. This can be verified with 3D imaging or may be discovered later at the time of surgery. Personally, I want to know the situation ahead of laying blade to tissue.
Was the tooth extracted due to a failed endodontic treatment? Implant failure in sites of previous endodontic failure may be infected by residual bacterial species vegetating in the healed osseous site. These may then colonize the subsequently placed implant surface, resulting in a failure to osseointegrate.11 Anecdotally, this author has seen evidence to support this theory.
RADIOGRAPHIC EVALUATION
At a minimum, 2D radiographs, such as PAs (Solo [Jazz Imaging]) and panographs (PaX-i Green 3D [Vatech America]), are mandatory for implant placement (Figure 3). These films have some drawbacks to them and leave behind unknowns. By the very nature of 2D radiographs, it is only possible to ascertain mesial-distal and vertical dimensions. Accuracy, however, is only as good as the calibration of the image. Due to foreshortening and elongation of the image, markers of known size are necessary to assure accurate measurement. Millions of implants have been placed successfully with 2D radiographs only. I spent the first 15 years of my career placing implants with only the aid of PAs and panos.
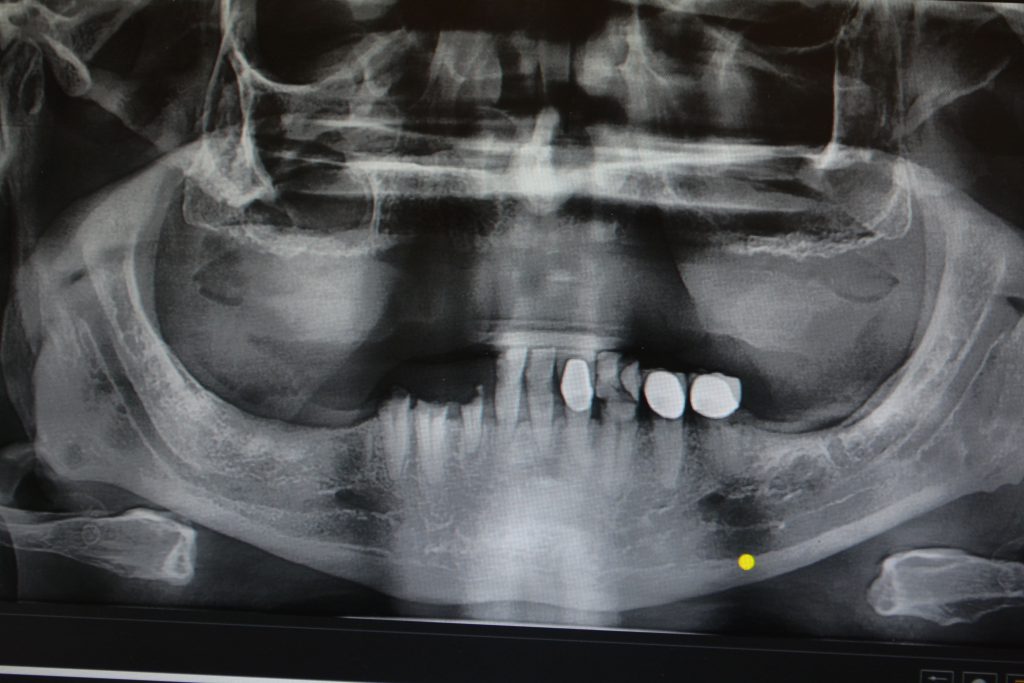
Figure 3. A 2D panoramic cannot show buccal-lingual dimensions.
The information we need to keep ourselves out of trouble is the location of adjacent teeth, large nerves, and anatomical structures. For example, in the maxillary arch, the location of the maxillary sinus, nasal cavity, and nasopalatine canal are of importance (Figure 4). While in the mandible, the inferior alveolar canal, mental foramen, and submandibular fossa are locations of interest (Figure 5).
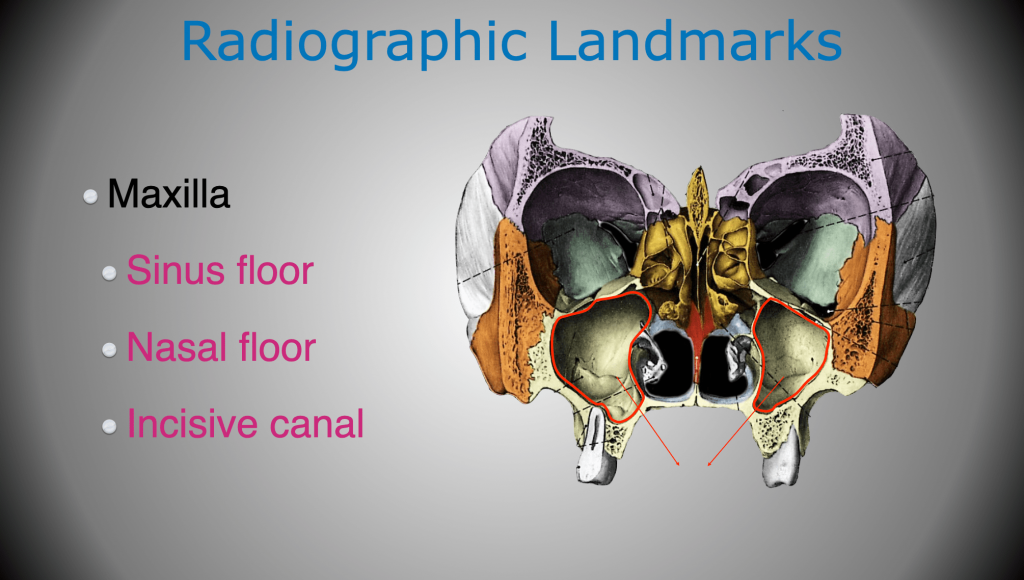
Figure 4. Maxillary landmarks.
Arai et al12 in Japan and Mozzo et al13 in Italy, working independently, introduced CBCT for oral and maxillofacial applications, and this changed the way we look at the placement of implants. Over the years, this technology has become much better in accuracy and image quality, with lowered radiation dosages to the patient, but the machines have also come down in price dramatically. Just as I would hate to give up digital radiography for old e-speed x-rays, I could never go back to placing implants without the aid of CBCT technology. The sheer amount of information one can get, including bone volume, anatomical considerations, pathology, and bone density (Hounsfield units), makes treatment planning more accurate and the day of surgery easier. This technology also enables the use of guided implant surgery, which we will touch upon later.
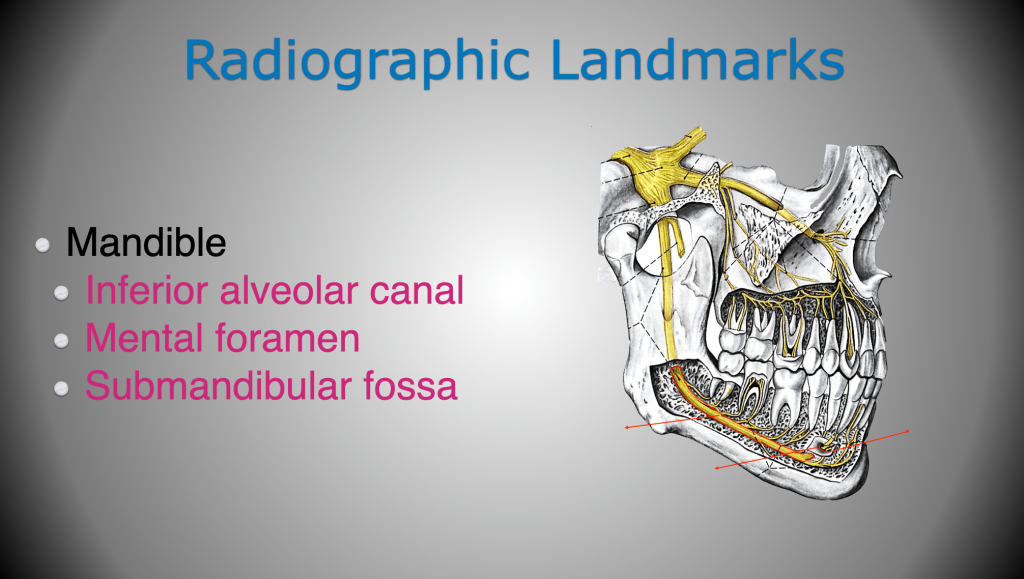
Figure 5. Mandibular landmarks.
As with any technology, and as accurate as CBCT machines can be, mistakes can be made in how images are viewed. In this example, it is the same area, but the angulation of the slice was changed slightly. It resulted in thinking there was an additional 1 mm in vertical space (Figure 6). Ultimately, accuracy is in the hands of those using it.
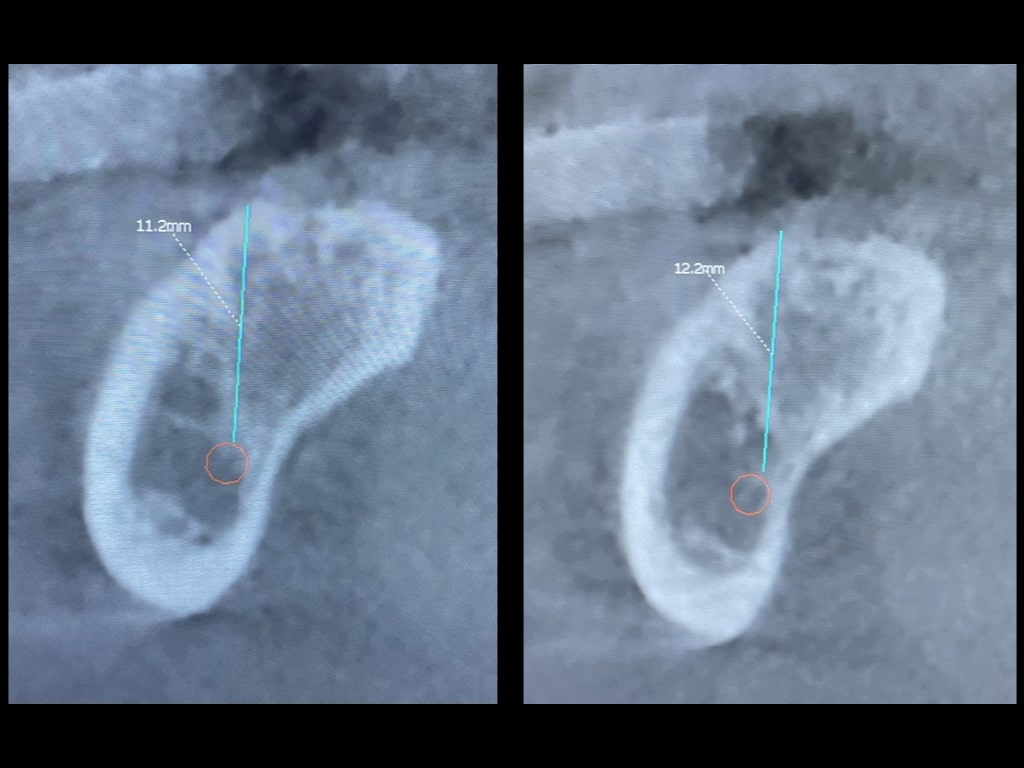
Figure 6. An error that can occur in a CBCT scan.
SURGICAL CONSIDERATIONS
Now that you have done your initial workup, it is time to figure out how you will go about the surgery and what you will need for it.
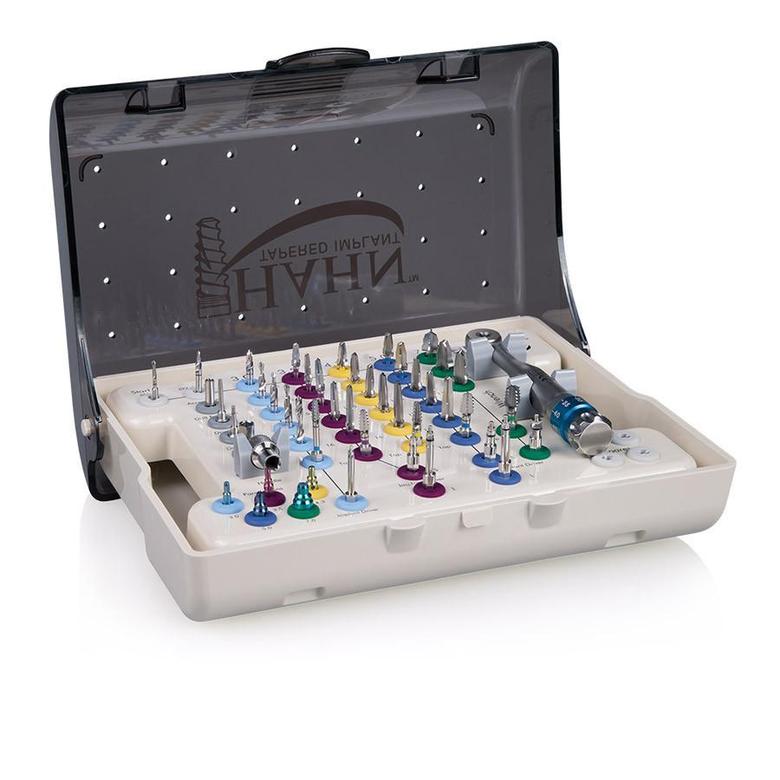
Figure 7. Freehand surgical kit (Hahn Tapered Implant System [Glidewell]).
Let’s first talk a little bit about surgical kits. Obviously, your specific implant system will have its own intricacies and idiosyncrasies, but all systems work essentially the same with variations in size, prosthetic connections, and drills/drivers (Hahn Tapered Implant System [Glidewell]) (Figure 7). These types of kits are designed for freehand placement. The second type of kit is a guided surgical kit that requires a bit more preplanning before use. These kits require the use of a surgical guide and the CBCT workup (3Shape) necessary for it (Figure 8).
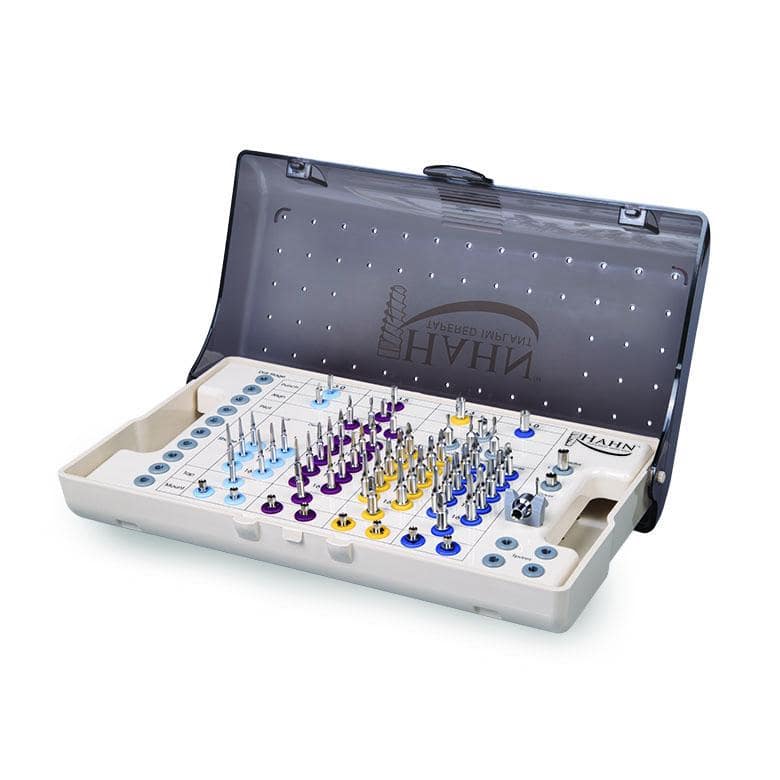
Figure 8. Guided surgical kit (Hahn Tapered Implant System [Glidewell])
The patient will need to have a CT scan taken, and then DICOM files and other pertinent information is sent to a lab to treatment plan and fabricate the guide (Glidewell) (Figure 9). It is also possible to either do some planning yourself, if you have software, or use shareware and then either send the info to a lab or use a 3D printer in-house to fabricate the guide (Figure 10). As the technology becomes better and the cost comes down—just like with in-office milling—it ultimately comes down to how much you want to do yourself.
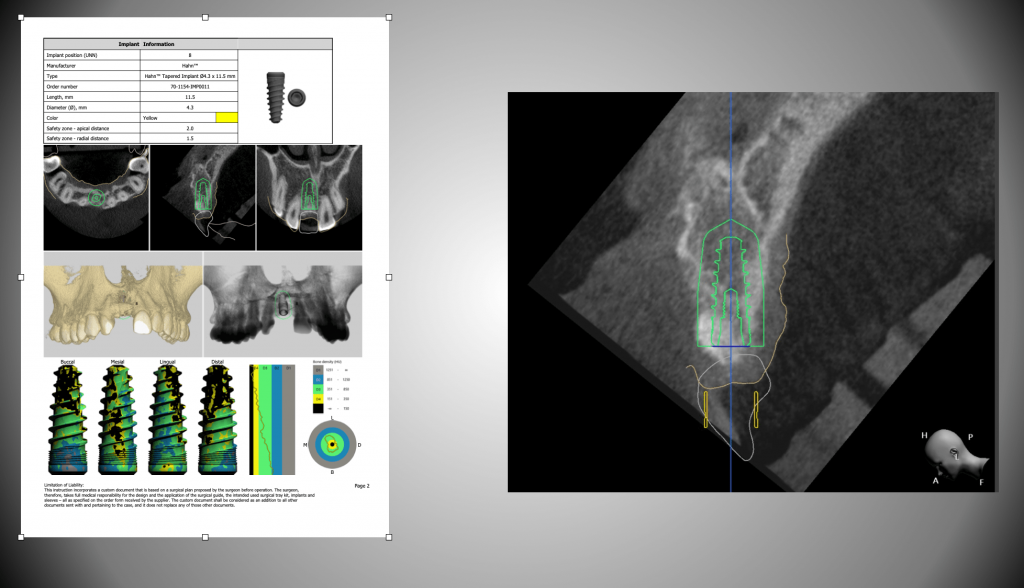
Figure 9. Guided surgery workup (Glidewell).
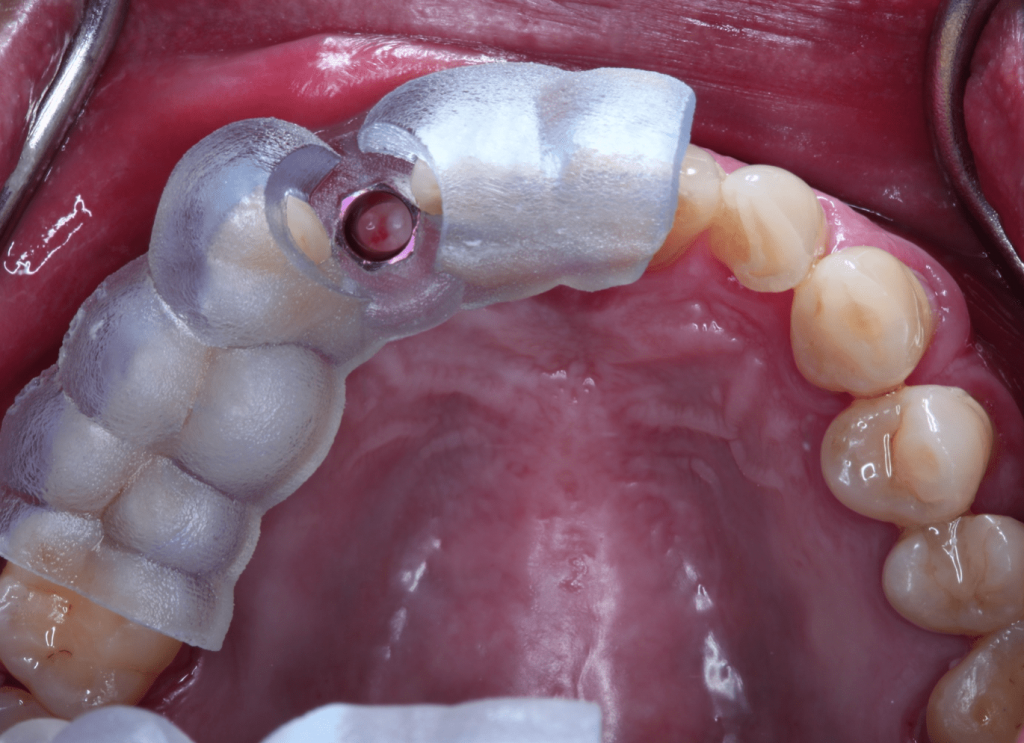
Figure 10. Tooth-supported surgical guide.
SURGICAL ACCESS
When getting ready for the surgery, you will need to decide upon the type of access you will make to expose the bony crest and whether you plan to do a one- or 2-stage surgery.
In this author’s opinion, flapless implant placement should be reserved for guided surgery only or when doing immediate placements. Otherwise, a greater amount of mistakes could occur when compared to placements done with full reflection, especially by less-experienced practitioners. The literature backs this up by stating that flapless surgeries should be restricted to well-selected cases in which proper clinical and radiological planning has been done.14
In addition, flapless placement cannot be used when there is not sufficient keratinized tissue present. Remember what was said a few paragraphs back regarding the necessity of keratinized tissue around an abutment? Well, if you use a tissue punch and end up with part of the access in unattached mucosa (Figure 11), then you have created an issue that will haunt you down the line. So if you do not want to have to do a connective tissue graft at either the time of surgery or later on, choose to reflect instead.
Figure 11. Tissue punch into unattached mucosa.
On the contrary, full-thickness elevations allow you to reposition keratinized tissue for the best possible outcome as well as give direct visualization to the crest and facilitate the identification and repair of defects. It also allows you to recontour the bone if necessary.
When reflecting soft tissue, here are a few tips to make it go smoothly. Always incise all the way through the periosteum. One mistake I see so many doctors make is incising only through the mucosa and connective tissue layers. Then, when trying to reflect the tissue, the periosteum is bound down, and they end up struggling as they tear their way through the tissue. This can result in increased postoperative discomfort for the patient and can be avoided by pushing down hard with the scalpel and scoring the bone. This will ensure you have cut through the tissue you need to.
A word about surgical instruments: Your periosteal elevators should have a sharp transition from the heal to the face (Figure 12). If they look serrated because you have hit them too many times with your high-speed, then retire it. If the elevator looks more like a wax spatula, then put it in your lab and buy yourself a new one. The sharper your instruments are, the better they will perform. Having all your instruments packaged together in a cassette can avoid issues of not having the correct instrument for the job and will prevent unnecessary stoppages during surgery when your assistant has to grab something that was forgotten in setup.
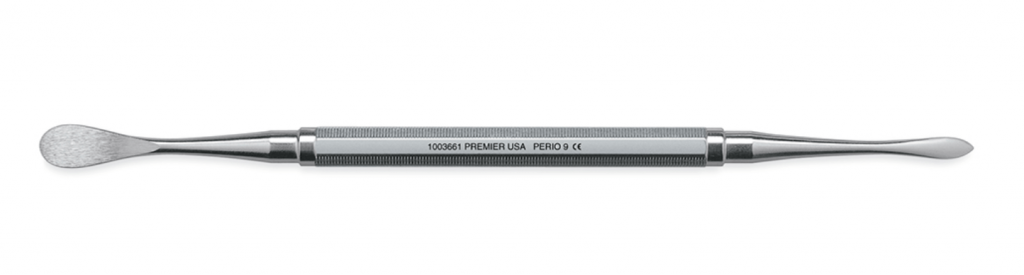
Figure 12. Periosteal elevator.
Finally, make sure that you or your assistants are aware of where retractors are being positioned. The edge or tip of retractors such as Minnesota’s or Seldin’s should be on bone and not impinging on soft tissue. It is easy to catch a reflected soft-tissue flap under an elevator, and the result is bruising, which will likely contribute to post-op discomfort for your patient. The takeaway here is this: The less trauma you cause, the less inflammation that will occur and the less pain for your patient. Trust me when I say that will be a practice builder for you.
Plan for your temporization by anticipating what you intend to do. If you plan a 2-stage surgery, you will place your implant and then close with primary closure. I like to use PGA sutures (Newport Medical) in my implant cases. I can leave them for approximately 2.5 weeks and then remove them, knowing they will not dissolve before that time. A one-stage surgery will require that you have a healing abutment available so that you can close the soft tissue in close approximation to the healing abutment, and it will later provide access to the implant and shape the soft tissue without having to subject the patient to a second surgery. The choice between the 2 usually comes down to what degree of primary stability you have upon placement of the implant. A rotational torque value under 30 Ncm or an ISQ reading of less than 55 on a Penguin (Integration Diagnostics) or Osstell (Osstell AB) unit will usually require a flat healing screw and a primary closure. Levels higher than that allow you to safely place a healing abutment. Primary stability is so important in these decisions because even though a healing abutment is not in function, it will still be subjected to loading forces by the tongue, musculature, and food during mastication. The implant will need to be stable enough to resist a sliding micromotion of 150 µm in order to allow osseointegration to occur.15
CONCLUSION
This article is an attempt to make you aware of some of the aspects of treatment planning that can make the treatment you provide your patients more successful and predictable. At first glance, it may seem very basic—and that’s because it is. If you do not make things more complicated than they have to be, it can be easy. Sure, cases can get complex in a hurry, but good treatment planning will allow you to tackle most cases with ease. With the creation and instituting of protocols that you can follow every time, you will become more comfortable and gain the confidence you need to provide a great service for your patients every time.
I know a lot of information was thrown at you just now. All this information can be overwhelming, but if you step back and take a breath, you will be in control of your success.
References
1. Moraschini V, Poubel LA, Ferreira VF, et al. Evaluation of survival and success rates of dental implants reported in longitudinal studies with a follow-up period of at least 10 years: a systematic review. Int J Oral Maxillofac Surg. 2015;44(3):377-88. doi:10.1016/j.ijom.2014.10.023
2. Howe MS, Keys W, Richards D. Long-term (10-year) dental implant survival: A systematic review and sensitivity meta-analysis. J Dent. 2019;84:9-21. doi:10.1016/j.jdent.2019.03.008
3. iData Research. U.S. dental implant statistics show a shift to value and discount implants. Published August 2, 2019. Available at: https://idataresearch.com/us-dental-implant-statistics-show-a-shift-to-value-discount-implants/
4. Khader YS, Dauod AS, El-Qaderi SS, et al. Periodontal status of diabetics compared with nondiabetics: a meta-analysis. J Diabetes Complications. 2006;20(1):59-68. doi:10.1016/j.jdiacomp.2005.05.006
5. Abiko Y, Selimovic D. The mechanism of protracted wound healing on oral mucosa in diabetes. Review. Bosn J Basic Med Sci. 2010;10(3):186-91. doi:10.17305/bjbms.2010.2683
6. Harvard Health Publishing. Autoimmunity indicators on the rise among Americans. Published July 01, 2020. Available at: https://www.health.harvard.edu/diseases-and-conditions/autoimmunity-indicators-on-the-rise-among-americans
7. Giro G, Chambrone L, Goldstein A, et al. Impact of osteoporosis in dental implants: A systematic review. World J Orthop. 2015;6(2):311-5. doi:10.5312/wjo.v6.i2.311
8. Resnik R. What to do with patients on denosumab? Misch International Implant Institute Newsletter. Published February 2021. Available at: https://misch.com/newsletters/february-2021/
9. Ouanounou A, Hassanpour S, Glogauer M. The influence of systemic medications on osseointegration of dental implants. J Can Dent Assoc. 2016;82:g7
10. Abebe W. Review of herbal medications with the potential to cause bleeding: dental implications, and risk prediction and prevention avenues. EPMA J. 2019;10(1):51-64. doi:10.1007/s13167-018-0158-2
11. Flanagan D. Implant placement in failed endodontic sites: a review. J Oral Implantol. 2016;42(2):224-30. doi:10.1563/aaid-joi-D-15-00126
12. Arai Y, Tammisalo E, Iwai K, et al. Development of a compact computed tomographic apparatus for dental use. Dentomaxillofac Radiol. 1999;28(4):245-8. doi:10.1038/sj/dmfr/4600448
13. Mozzo P, Procacci C, Tacconi A, et al. A new volumetric CT machine for dental imaging based on the cone-beam technique: preliminary results. Eur Radiol. 1998;8(9):1558-64. doi:10.1007/s003300050586
14. Romero-Ruiz MM, Mosquera-Perez R, Gutierrez-Perez JL, et al. Flapless implant surgery: A review of the literature and 3 case reports. J Clin Exp Dent. 2015;7(1):e146-52. doi:10.4317/jced.51985
15. Schlesinger C. Torque versus RFA in implant placement. Implant Practice US. August/September 2016. Available at: https://implantpracticeus.com/torque-versus-rfa-implant-placement-case-study/
ABOUT THE AUTHOR
Dr. Schlesinger is a dental implant educator and clinician who has been lecturing internationally for 16 years. He graduated with honors from The Ohio State University College of Dentistry in 1996. After graduation, he completed a general practice residency at the San Diego VA Medical Center and then went on to become the chief resident at the West Los Angeles VA Medical Center. During his time in Los Angeles, he completed extensive training in oral surgery, implantology, and advanced restorative treatment. Once he completed his residency, Dr. Schlesinger maintained a thriving restorative and implant practice in San Diego for 14 years. He is a Fellow of the International Congress of Oral Implantologists. In 2012, he became the director of education and clinical affairs—and later, COO—for a surgical device company. In 2016, Dr. Schlesinger re-entered private practice, and in 2018, he became the COO of Comfortable Dentistry 4U, a multi-office dental group, where he continues to provide comprehensive implant care to patients in a private practice setting in Albuquerque. He can be reached at cdschlesinger@gmail.com.
Disclosure: Dr. Schlesinger is a KOL for Hahn Implant System and Glidewell.